
A very exciting thing happened recently in the 19H1 (Version 1903) release of Windows 10 – parts of the Intel “Control-flow Enforcement Technology” (CET) implementation finally began, after years of discussion. More of this implementation is being added in every Windows release, and this year’s release, 20H1 (Version 2004), completes support for the User Mode Shadow Stack capabilities of CET, which will be released in Intel Tiger Lake CPUs.
As a reminder, Intel CET is a hardware-based mitigation that addresses the two types of control-flow integrity violations commonly used by exploits: forward-edge violations (indirect CALL and JMP instructions) and backward-edge violations (RET instructions).
While the forward-edge implementation is less interesting (as it is essentially a weaker form of clang-cfi, similar to Microsoft’s Control Flow Guard), the backward-edge implementation relies on a fundamental change in the ISA: the introduction of a new stack called the “Shadow Stack”, which now replicates the return addresses that are pushed on the stack by the CALL instruction, with the RET instruction now validating both the stack and shadow stack values and generating an INT #21 (Control Flow Protection Fault) in case of mismatch.
Because operating systems and compilers must sometimes support control flow sequences other than CALL/RET (such as exception unwinding and longjmp), the “Shadow Stack Pointer” (SSP) must sometimes be manipulated at the system level to match the required behavior — and in turn, validated to avoid this manipulation itself from becoming a potential bypass. In this post, we’ll cover how Windows achieves this.
Before diving deeper into how Windows manipulates and validates the shadow stack for threads, there are 2 parts of its implementation that must be first understood. The first is the actual location and permissions of the SSP, and the second is the mechanism used to store/restore SSP when context switching between threads, as well as how modifications can be done to SSP when needed (such as during exception unwinding).
To explain these mechanisms, we’ll have to delve into an Intel CPU feature that was originally introduced by Intel in order to support “Advanced Vector eXtensions” (AVX) Instructions and first supported by Microsoft in Windows 7. And since adding support for this feature required a massive restructuring of the CONTEXT structure into an undocumented CONTEXT_EX structure (and the addition of documented and native APIs to manipulate it), we’ll have to talk about the internals of that too!
Finally, we’ll even have to go through some compiler and PE file format internals, as well as new process information classes, to cover additional subtleties and requirements for CET functionality on Windows. We hope the Table of Contents, below, will help you navigate this thorough coverage of these capabilities. Additionally, when relevant, annotated source code for the various newly introduced functions is available by clicking the function names, based off our associated GitHub repository.
XState Internals
The x86-x64 architecture class processors originally began with a simple set of registers which most security researchers are familiar with — general purpose registers (RAX, RCX), control registers (RIP/RSP, for example), floating point registers (XMM, YMM, ZMM), and some control, debug, and test registers. As more processor capabilities were added, however, new registers had to be defined, as well as specific processor state associated with these capabilities. And since many of these features are local to a thread, they must be saved and restored during context switches.
In response, Intel defined the “eXtended State” (XState) specification, which associates various processor states with bits in a “State Mask”, and introduces instructions such as XSAVE and XRSTOR to read and write the requested states from an “XSAVE Area”. Since this area is now a critical piece of CET register storage for each thread, and most people have largely been ignoring XSAVE support due to its original focus on floating point, AVX, and “Memory Protection eXtensions” (MPX) features, we thought an overview of the functionality and memory layout would be helpful to readers.
XSAVE Area
As mentioned, the XSAVE Area was originally used to store some of the new floating point functionality like AVX that had been added to processors by Intel, and to consolidate the existing x87 FPU and SSE states that were previously stored through the FXSTOR and FXRSTR instructions. These first two legacy states were defined as part of the “Legacy XSAVE Area”, and any further processor registers (such as AVX) were added to an “Extended XSAVE Area”. In between, an “XSAVE Area Header” is used to describe which extended features are present through a state mask called XSTATE_BV.
At the same time, a new “eXtended Control Register” (XCR0) was added, which defines which states are supported by the operating system as part of the XSAVE functionality, and the XGETBV and XSETBV instructions were added to configure XCR0 (and potentially future XCRs as well). For example, operating systems can choose to program XCR0 not to contain the feature state bits for x87 FPU and SSE, meaning that they will save this information manually with legacy FXSTOR instructions, and only store extended feature state in their XSAVE Areas.
As the number of advanced register sets and capabilities — such as “Memory Protection Keys” (MPK), which added a “Protection Key Register User State” (PKRU) — grew, newer processors introduced a distinction between “Supervisor State” that can only be modified by CPL0 code using XSAVES and XRSRTORS as well as “compaction” and “optimization” versions (XSAVEC/XSAVEOPT) to complicate matters in Intel-typical fashion. A new “Model Specific Register” (MSR), called IA32_XSS, was added to define which states are supervisor-only.

The “optimized XSAVE” mechanism exists to ensure that only processor state which has actually been modified by another thread since the last context switch (if any) will actually be written in the XSAVE Area. An internal processor register, XINUSE, exists to track this information. When XSAVEOPT is used, the XSTATE_BV mask now includes only the bits corresponding to states which were actually saved, and not simply that of all of the states requested.
The “compacted XSAVE” mechanism, on the other hand, fixed a wasteful flaw in the XState design: as more and more extended features were added — such as AVX512 and “Intel Processor Trace” (IPT) — it meant that even for threads which did not use these capabilities, a sufficiently large XSAVE Area needed to be allocated, and written into (full of zeroes) by the processor. While optimized XSAVE would avoid these writes, it still meant that any extended features following large-yet-unused states would be at large offsets away from the base XSAVE Area buffer.
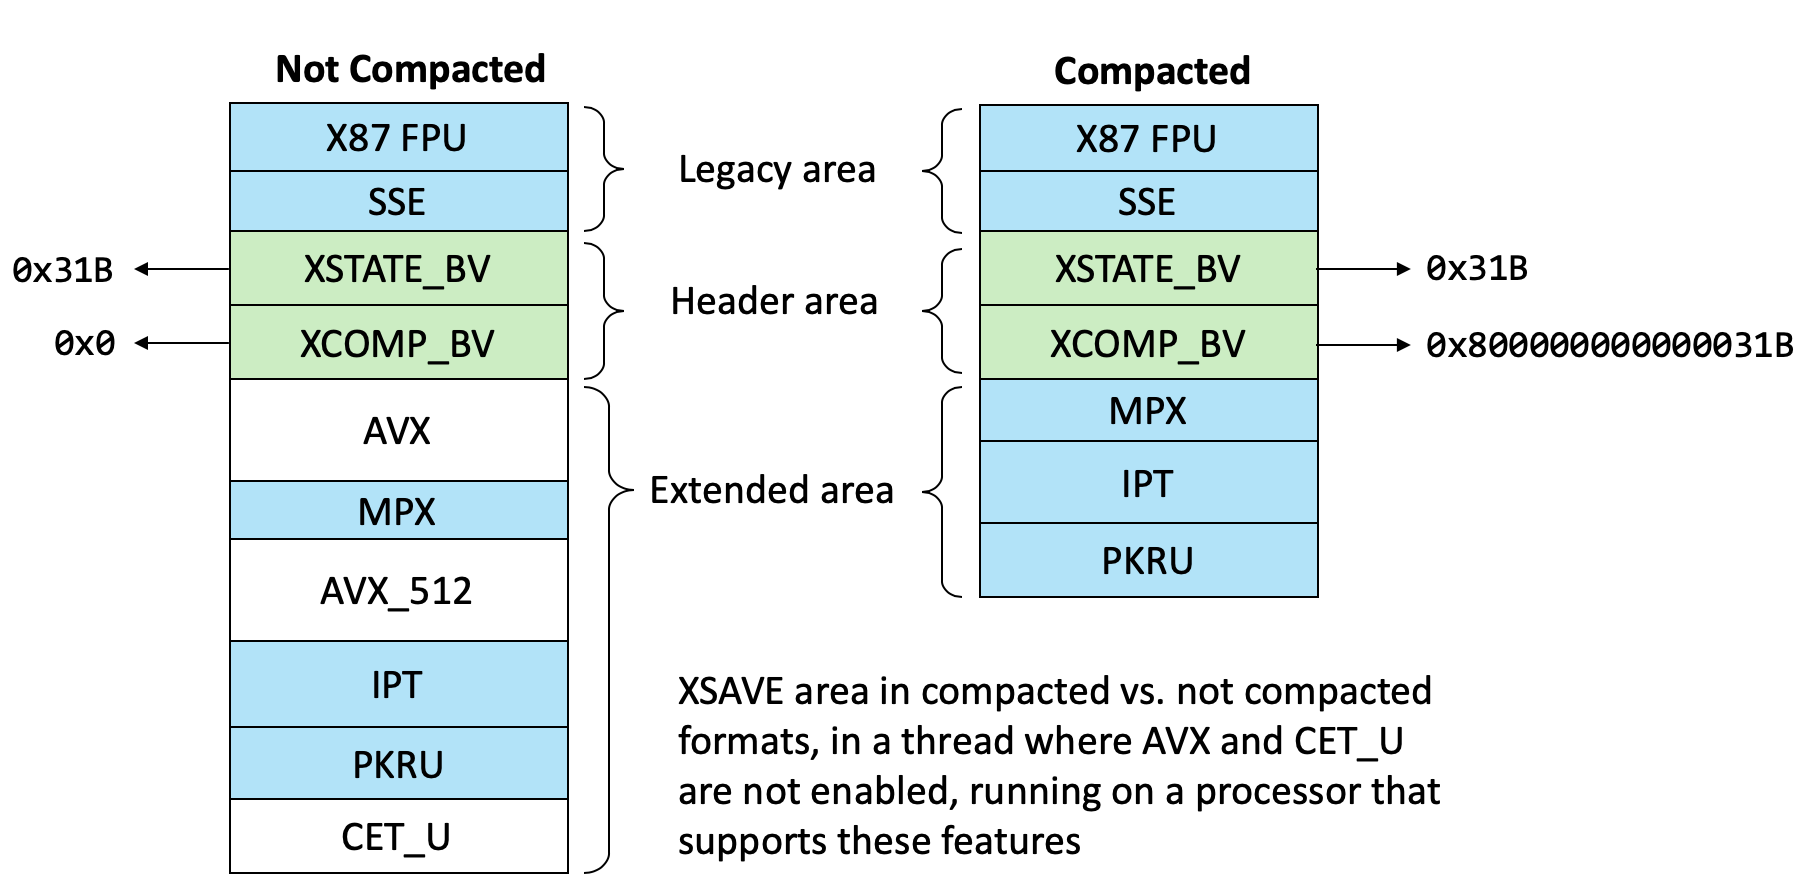
With XSAVEC, this problem is solved by only using space to save the XState features that are actually enabled (and in-use, as compaction implies optimization) by the current thread, and sequentially laying out each saved state in memory, without gaps in between (but potentially with a fixed 64-byte alignment, which is provided as part of an “Alignment Mask” through CPUID). The XSAVE Area Header shown earlier is now extended with a second state mask called XCOMP_BV, which indicates which of the requested state bits that were requested might be present in the compated area. Note that unlike XSTATE_BV, this mask does not omit the state bits that were not part of XINUSE — it includes all possible bits that could’ve been compacted — one must still check XSTATE_BV to determine which state areas are actually present. Finally, Bit 63 is always set in XCOMP_BV when the compacted instruction was used, as an indicator for which format the XSAVE Area has.
Thus, using the compacted vs. non-compacted format determines the internal layout and size of the XSAVE Area. The compacted format will only allocate memory in the XSAVE Area for processor features used by the thread, while the non-compacted one will allocate memory for all the processor features supported by the processor, but only populate the ones used by the thread. The diagram below shows an example of how the XSAVE Area will look like for the same thread but when using one vs. the other format.
To summarize, which states the XSAVE*/XRSTOR* family of instructions will work with is a combination of
- What state bits the OS claims it supports in
XCR0(set using theXSETBVinstruction) - What state bits the caller stores in
EDX:EAXwhen using theXSAVEinstruction (Intel calls this the “instruction mask”) - If using the non-privileged instructions, which state bits are not set in
IA32_XSS - On processors that support “Optimized
XSAVE”, which state bits are set inXINUSE, an internal register that tracks the actual XState-related registers that have been used by the current thread since the last transition
Once these bits are masked together, the final set of resulting state bits are written by the XSAVE instruction into the header of the XSAVE Area in a field called the XSTATE_BV. In the case where “Compacted XSAVE” is used, the resulting state bits omitting bullet 4 (XINUSE) are written into the header of the XSAVE Area in the XCOMP_BV field. The diagram below shows the resulting masks.

XState Configuration
Because each processor has its own set of XState-enabled features, potential sizes, capabilities, and mechanisms, Intel exposes all of this information through various CPUID classes that an operating system should query when dealing with XState. Windows performs these queries at boot, and stores the information in an XSTATE_CONFIGURATION structure, which is shown below (documented in Winnt.h)
typedef struct _XSTATE_CONFIGURATION
{
     ULONG64 EnabledFeatures;
     ULONG64 EnabledVolatileFeatures;
     ULONG Size;
     union
     {
         ULONG ControlFlags;
         struct
         {
             ULONG OptimizedSave:1;
             ULONG CompactionEnabled:1;
         };
     };
     XSTATE_FEATURE Features[MAXIMUM_XSTATE_FEATURES];
     ULONG64 EnabledSupervisorFeatures;
     ULONG64 AlignedFeatures;
     ULONG AllFeatureSize;
     ULONG AllFeatures[MAXIMUM_XSTATE_FEATURES];
     ULONG64 EnabledUserVisibleSupervisorFeatures;
 } XSTATE_CONFIGURATION, *PXSTATE_CONFIGURATION;
After filing out this data, the kernel saves this information in the KUSER_SHARED_DATA structure, which can be accessed through the SharedUserData variable and is located at 0x7FFE0000 on all Windows platforms.
For example, here is the output of our test 19H1 system, which supports both optimized and compacted forms of XSAVE, and has the x87 FPU (0), SSE (1), AVX (2) and MPX (3, 4) feature bits enabled.
dx ((nt!_KUSER_SHARED_DATA*)0x7ffe0000)->XState
    [+0x000] EnabledFeatures  : 0x1f [Type: unsigned __int64]
    [+0x008] EnabledVolatileFeatures : 0xf [Type: unsigned __int64]
    [+0x010] Size         	: 0x3c0 [Type: unsigned long]
    [+0x014] ControlFlags 	: 0x3 [Type: unsigned long]
    [+0x014 ( 0: 0)] OptimizedSave	: 0x1 [Type: unsigned long]
    [+0x014 ( 1: 1)] CompactionEnabled : 0x1 [Type: unsigned long]
    [+0x018] Features     	[Type: _XSTATE_FEATURE [64]]
    [+0x218] EnabledSupervisorFeatures : 0x0 [Type: unsigned __int64]
    [+0x220] AlignedFeatures  : 0x0 [Type: unsigned __int64]
    [+0x228] AllFeatureSize   : 0x3c0 [Type: unsigned long]
    [+0x22c] AllFeatures  	[Type: unsigned long [64]]
    [+0x330] EnabledUserVisibleSupervisorFeatures : 0x0 [Type: unsigned __int64]
In the Features array, the size and offset of each of these five features can be found:
dx -r2 (((nt!_KUSER_SHARED_DATA*)0x7ffe0000)->XState)->Features.Take(5)
    [0]          	[Type: _XSTATE_FEATURE]
        [+0x000] Offset       	: 0x0 [Type: unsigned long]
        [+0x004] Size         	: 0xa0 [Type: unsigned long]
    [1]          	[Type: _XSTATE_FEATURE]
        [+0x000] Offset       	: 0xa0 [Type: unsigned long]
        [+0x004] Size         	: 0x100 [Type: unsigned long]
    [2]          	[Type: _XSTATE_FEATURE]
        [+0x000] Offset       	: 0x240 [Type: unsigned long]
        [+0x004] Size         	: 0x100 [Type: unsigned long]
    [3]          	[Type: _XSTATE_FEATURE]
        [+0x000] Offset       	: 0x340 [Type: unsigned long]
        [+0x004] Size         	: 0x40 [Type: unsigned long]
    [4]          	[Type: _XSTATE_FEATURE]
        [+0x000] Offset       	: 0x380 [Type: unsigned long]
        [+0x004] Size         	: 0x40 [Type: unsigned long]
Adding up these sizes gives us 0x3C0, which is the value seen above in the FeatureSize field. Note, however, that since this system supports the Compacted XSAVE capability, the offsets shown here are not relevant, and only the AllFeatures field is useful to the kernel, which contains the size of every feature, but not its offset (as this will be determined based on the compaction mask used in XCOMP_BV).
XState Policy
Unfortunately, even though a processor might claim to support a given XState feature, it oftens turns out that due to various hardware errata, certain specific processors may not fully, or correctly, support the feature after all. In order to handle this eventuality, Windows uses an XState Policy, which is information stored in the resource section of a Hardware Policy Driver that is normally called HwPolicy.sys.
As the Intel x86 architecture is a combination of multiple processor vendors all competing with variants of each other’s feature sets, the kernel must parse the XState policy and compare the current processor’s Vendor String and Microcode Version as well as its Signature, Features, and Extended Features (namely, RAX, RDX, and RCX from a CPUID 01h query), looking for a match in the policy.
This work is done at boot by the KiIntersectFeaturesWithPolicy function that’s called by KiInitializeXSave, which calls KiLoadPolicyFromImage to load the appropriate XState policy, calls KiGetProcessorInformation to get the CPU data mentioned earlier, and then validates each feature bit currently enabled in the XState Configuration through calls to KiIsXSaveFeatureAllowed.
These functions work with resource 101 in the HwPolicy.sys driver, which begins with the following data structure:
typedef struct _XSAVE_POLICY{ ULONG Version; ULONG Size; ULONG Flags; ULONG MaxSaveAreaLength; ULONGLONG FeatureBitmask; ULONG NumberOfFeatures; XSAVE_FEATURE Features[1];} XSAVE_POLICY, *PXSAVE_POLICY;
For example, on our 19H1 system, the contents (which we extracted with Resource Hacker), were as follows:
dx @$policy = (_XSAVE_POLICY*)0x253d0e90000
[+0x000] Version       : 0x3 [Type: unsigned long]
[+0x004] Size          : 0x2fd8 [Type: unsigned long]
[+0x008] Flags         : 0x9 [Type: unsigned long]
[+0x00c] MaxSaveAreaLength : 0x2000 [Type: unsigned long]
[+0x010] FeatureBitmask   : 0x7fffffffffffffff [Type: unsigned __int64]
[+0x018] NumberOfFeatures : 0x3f [Type: unsigned long]
[+0x020] Features      [Type: _XSAVE_FEATURE [1]]
For each XSAVE_FEATURE, an offset to a XSAVE_VENDORS structure is found, which contains an array of XSAVE_VENDOR structures, each with a CPU Vendor String (for now, each seem to be either “GenuineIntel”, “AuthenticAMD”, or “CentaurHauls”), and an offset to an XSAVE_CPU_ERRATA structure. For example, our 19H1 test system had the following information for Feature 0:
dx -r4 @$vendor = (XSAVE_VENDORS*)((int)@$policy->Features[0].Vendors + 0x253d0e90000)
[+0x000] NumberOfVendors  : 0x3 [Type: unsigned long]
[+0x008] Vendor        [Type: _XSAVE_VENDOR [1]]
    [0]           [Type: _XSAVE_VENDOR]
        [+0x000] VendorId      [Type: unsigned long [3]]
            [0]           : 0x756e6547 [Type: unsigned long]
            [1]           : 0x49656e69 [Type: unsigned long]
            [2]           : 0x6c65746e [Type: unsigned long]
[+0x010] SupportedCpu  [Type: _XSAVE_SUPPORTED_CPU]
[+0x000] CpuInfo       [Type: XSAVE_CPU_INFO]
[+0x020] CpuErrata     : 0x4c0 [Type: XSAVE_CPU_ERRATA *]
[+0x020] Unused        : 0x4c0 [Type: unsigned __int64]
Finally, each XSAVE_CPU_ERRATA structure contains the matching processor information data that corresponds to a known errata which prevents the specified XState feature from being supported. For example, in our test system, the first errata from the offset above was:
dx -r3 @$errata = (XSAVE_CPU_ERRATA*)((int)@$vendor->Vendor[0].SupportedCpu.CpuErrata + 0x253d0e90000)
    [+0x000] NumberOfErrata   : 0x1 [Type: unsigned long]
    [+0x008] Errata       	[Type: XSAVE_CPU_INFO [1]]
        [0]          	[Type: XSAVE_CPU_INFO]
            [+0x000] Processor    	: 0x0 [Type: unsigned char]
            [+0x002] Family       	: 0x6 [Type: unsigned short]
            [+0x004] Model        	: 0xf [Type: unsigned short]
            [+0x006] Stepping     	: 0xb [Type: unsigned short]
            [+0x008] ExtendedModel	: 0x0 [Type: unsigned short]
            [+0x00c] ExtendedFamily   : 0x0 [Type: unsigned long]
            [+0x010] MicrocodeVersion : 0x0 [Type: unsigned __int64]
            [+0x018] Reserved     	: 0x0 [Type: unsigned long]
A tool which dumps your system’s hardware policy for all XState features is available on our GitHub here. For now, only one errata appears in the entire policy (the one showed above).
Finally, the following optional loader command line options (and respective BCD settings) can be used to further customize XState capabilities:
- The
XSAVEPOLICY=xsavepolicyBCD option, which setsKeXSavePolicyId, indicating which of the XState policies to load. - The
XSAVEREMOVEFEATURE=xsaveremovefeatureBCD option, which sets KeTestRemovedFeatureMask. This will be later parsed byKiInitializeXSaveand elide the specified state bits from the support. Note that State0(x87 FPU) and State1(SSE) cannot be removed this way. - The
XSAVEDISABLEload option, set through thexsavedisableBCD option, which setsKeTestDisableXsave, and causesKiInitializeXSaveto set all XState related configuration data to0, disabling the whole XState feature entirely.
CET XSAVE Area Format
As part of its implementation of CET, Intel defined two new bits in the XState standard, called XSTATE_CET_U (11) and XSTATE_CET_S (12), corresponding to user and supervisor state, respectively. The first state is a 16-byte data structure which MSDN documents as XSAVE_CET_U_FORMAT containing the IA32_U_CET MSR (which is where the “Shadow Stack Enable” flag is configured) and the IA32_PL3_SSP MSR (where the “Privilege Level 3 SSP” is stored). The second, which does not yet have an MSDN definition, includes the IA32_PL0/1/2_SSP MSRs.
typedef struct _XSAVE_CET_U_FORMAT{ ULONG64 Ia32CetUMsr; ULONG64 Ia32Pl3SspMsr;} XSAVE_CET_U_FORMAT, *PXSAVE_CET_U_FORMAT;typedef struct _XSAVE_CET_S_FORMAT{ ULONG64 Ia32Pl0SspMsr; ULONG64 Ia32Pl1SspMsr; ULONG64 Ia32Pl2SspMsr;} XSAVE_CET_S_FORMAT, *PXSAVE_CET_S_FORMAT;
As the field names suggest, CET-related “registers” are actually values stored in respective MSRs, which can normally only be accessed through RDMSR and WRMSR privileged instructions in Ring 0. However, unlike most MSRs which store processor-global data, CET can be enabled on a per-thread basis, and the shadow stack pointer is also obviously per-thread. For these reasons, CET-related data must be made part of the XState functionality such that operating systems can correctly handle thread switches.
Since CET registers are basically MSRs which can normally only be modified by kernel code, they are not accessible through the CPL3 XSAVE/XRSTOR instructions and their respective state bits are always set to 1 in the IA32_XSS MSR. However, what makes things harder is the fact that the operating system cannot completely block user-mode code from modifying SSP. User-mode code might legitimately need to update the SSP as part of exception handling, unwinding, setjmp/longjmp, or specific functionality such as Windows’ “Fiber” mechanism.
As such, operating systems need to provide a way for threads to modify CET state in XState through a system call, much like Windows provides SetThreadContext as a mechanism to update certain protected CPU registers such as CS and DR7, as long as certain rules are met. Therefore, in the next section we’ll see how the CONTEXT structure evolved into the CONTEXT_EX structure on more modern Windows versions in order to support XState-related information, and how CET-specific handling had to be added for legitimate exception-related scenarios, while also avoiding malicious control-flow attacks through corrupted CONTEXTs.
CONTEXT_EX Internals
In order to support the increasing number of registers that have to be saved on every context switch, new versions of Windows have the CONTEXT_EX structure, in addition to the legacy CONTEXT structure. This was needed due to the fact that CONTEXT is a fixed-size structure, while XSAVE has introduced the need for dynamically-sized processor state data that is dependent on the thread, processor, and even machine configuration policy.
CONTEXT_EX Structure
Unfortunately, although now used all over the kernel and user-mode exception handling functionality, the CONTEXT_EX structure is largely undocumented, save for the accidental release of some information in the Windows 7 header files and some Intel reference code (which might suggest Intel actually is responsible for defining this abomination). Simply take a look at this comment block and tell us if you can understand anything:
//
// This structure specifies an offset (from the beginning of CONTEXT_EX
// structure) and size of a single chunk of an extended context structure.
//
// N.B. Offset may be negative.
//
typedef struct _CONTEXT_CHUNK
{
    LONG Offset;
    DWORD Length;
} CONTEXT_CHUNK, *PCONTEXT_CHUNK;

//
// CONTEXT_EX structure is an extension to CONTEXT structure. It defines
// a context record as a set of disjoint variable-sized buffers (chunks)
// each containing a portion of processor state. Currently there are only
// two buffers (chunks) are defined:
//
//   - Legacy, that stores traditional CONTEXT structure;
//   - XState, that stores XSAVE save area buffer starting from
//     XSAVE_AREA_HEADER, i.e. without the first 512 bytes.
//
// There a few assumptions exists that simplify conversion of PCONTEXT
// pointer to PCONTEXT_EX pointer.
//
// 1. APIs that work with PCONTEXT pointers assume that CONTEXT_EX is
//    stored right after the CONTEXT structure. It is also assumed that
//    CONTEXT_EX is present if and only if corresponding CONTEXT_XXX
//    flags are set in CONTEXT.ContextFlags.
//
// 2. CONTEXT_EX.Legacy is always present if CONTEXT_EX structure is
//    present. All other chunks are optional.
//
// 3. CONTEXT.ContextFlags unambigiously define which chunks are
//    present. I.e. if CONTEXT_XSTATE is set CONTEXT_EX.XState is valid.
//
typedef struct _CONTEXT_EX
{
    //
    // The total length of the structure starting from the chunk with
    // the smallest offset. N.B. that the offset may be negative.
    //
    CONTEXT_CHUNK All;

    //
    // Wrapper for the traditional CONTEXT structure. N.B. the size of
    // the chunk may be less than sizeof(CONTEXT) is some cases (when
    // CONTEXT_EXTENDED_REGISTERS is not set on x86 for instance).
    //
    CONTEXT_CHUNK Legacy;
    //

    // CONTEXT_XSTATE: Extended processor state chunk. The state is
    // stored in the same format XSAVE operation strores it with
    // exception of the first 512 bytes, i.e. staring from
    // XSAVE_AREA_HEADER. The lower two bits corresponding FP and
    // SSE state must be zero.
    //
    CONTEXT_CHUNK XState;
} CONTEXT_EX, *PCONTEXT_EX;
#define CONTEXT_EX_LENGTH   ALIGN_UP_BY(sizeof(CONTEXT_EX), STACK_ALIGN)

//
// These macros make context chunks manupulations easier.
//
So while these headers do attempt to explain the layout of the CONTEXT_EX structure, the text is obtuse enough (and full of English errors) that it took us several rounds of arguments and shots until we could visualize it, and felt a diagram might be helpful.

As shown in the diagram, the CONTEXT_EX structure is always at the end of the CONTEXT structure, and has 3 fields of type CONTEXT_CHUNK called All, Legacy, and XState. Each of these define an offset and a length to the data associated with them, and various RTL_ macros exist to retrieve the appropriate data pointer.
The Legacy field refers to the beginning of the original CONTEXT structure (although the Length might be smaller on x86 if CONTEXT_EXTENDED_REGISTERS is not supplied). The All field refers to the beginning of the original CONTEXT structure as well, but its Length describes the totality of all the data, including the CONTEXT_EX itself and padding/alignment space required for the XSAVE Area. Finally, the XState field refers to the XSAVE_AREA_HEADER structure (which then defines the state mask of which state bits are enabled and thus whose data is present) and the length of the entire XSAVE Area. Due to this layout, it’s important to note that All and Legacy will have negative offsets.
Since all of this math is hard, Ntdll.dll exports various APIs to simplify building, reading, copying, and otherwise manipulating the various data that is stored in a CONTEXT_EX (some, but not all, of these APIs are internally used by Ntoskrnl.exe, but none are exported). In turn, KernelBase.dll exports documented Win32 functions which internally use these capabilities.
Initializing a CONTEXT_EX
First, callers should figure out how much memory to allocate in order to store a CONTEXT_EX, which can be done by using the following API:
NTSYSAPIULONGNTAPIRtlGetExtendedContextLength ( _In_ ULONG ContextFlags, _Out_ PULONG ContextLength);
Callers are expected to supply the appropriate CONTEXT_XXX flags to specify which registers they intend to save (and namely CONTEXT_XSTATE otherwise using a CONTEXT_EX does not really buy much). This API then reads SharedUserData.XState.EnabledFeatures and SharedUserData.XState.EnabledUserVisibleSupervisorFeatures and passes in the union of all the bits to an extended function (also exported) shown below.
NTSYSAPIULONGNTAPIRtlGetExtendedContextLength2 ( _In_ ULONG ContextFlags, _Out_ PULONG ContextLength,
_In_ ULONG64 XStateCompactionMask);
Note how this newer API allows manually specifying which XState states to actually save, instead of grabbing all enabled features from the XState Configuration in the Shared User Data. This results in a CONTEXT_EX structure that will be smaller and won’t contain enough space for all possible XState State Data, so future usage of this CONTEXT_EX should make sure to never leverage XState State Bits outside the specified mask.
Next, a caller would allocate memory for the CONTEXT_EX (in most cases Windows will use alloca() to avoid memory exhaustion failures in exception paths) and use one of these two APIs:
NTSYSAPIULONGNTAPIRtlInitializeExtendedContext ( _Out_ PVOID Context, _In_ ULONG ContextFlags,
_Out_ PCONTEXT_EX* ContextEx);NTSYSAPIULONGNTAPIRtlInitializeExtendedContext2 ( _Out_ PVOID Context, _In_ ULONG ContextFlags,
_Out_ PCONTEXT_EX* ContextEx,
_In_ ULONG64 XStateCompactionMask);
Just like before, the newer API allows manually specifying which XState states to save in their compacted form, otherwise all features available (based on SharedUserData) are assumed to be present. Obviously, it is expected that the caller specifies the same ContextFlags as in the call to RtlGetExtendedContextLength(2), to make sure that the context structure is of the correct size as was allocated. In return, the caller now receives a pointer to the CONTEXT_EX structure, which is expected to follow the input CONTEXT buffer.
Once a CONTEXT_EX exists, a caller would likely first be interested in obtaining the legacy CONTEXT structure back from it (without making assumptions on sizes), which can be done with this next API:
NTSYSAPIPCONTEXTNTAPI RtlLocateLegacyContext ( _In_ PCONTEXT_EX ContextEx, _Out_opt_ PULONG Length,);
As mentioned above, however, these are the undocumented and internal APIs that are exposed by the NT layer of Windows. Legitimate Win32 applications would instead simplify their usage of XState-compatible CONTEXT structures by using the following function(s) instead:
WINBASEAPIBOOLWINAPIInitializeContext ( _Out_writes_bytes_opt_(*ContextLength) PVOID Context, _In_ DWORD ContextFlags,
_Out_ PCONTEXT_EX Context,
_Inout_ PDWORD ContextFlags);WINBASEAPI
BOOL
WINAPI
InitializeContext2 ( _Out_writes_bytes_opt_(*ContextLength) PVOID Context,
    _In_ DWORD ContextFlags,
    _Out_ PCONTEXT_EX Context,
_Inout_ PDWORD ContextFlags,
_In_ ULONG64 XStateCompactionMask);
These two APIs behave similarly to a combination of using the undocumented APIs: when callers first pass in NULL as the Buffer and Context parameters, the function returns the required length in ContextLength, which callers should allocate from memory. On the second attempt, callers pass in the allocated pointer in Buffer, and receive a pointer to the CONTEXT structure in Context without any knowledge of the underlying CONTEXT_EX structure.
Controlling XState Feature Masks in CONTEXT_EX
In order to access the XSTATE_BV(the extended feature mask), which is deeply embedded in the Mask field of the XSAVE_AREA_HEADER of the CONTEXT_EX, the system exports two APIs for easily checking which XState features are enabled in the CONTEXT_EX, with a corresponding API for modifying the XState mask.
Note, however, that Windows never stores x87 FPU (0) and SSE (1) states in the XSAVE Area, and instead uses the FXSAVE instruction, meaning that the XSAVE Area will never contain the Legacy Area, and immediately start with the XSAVE_AREA_HEADER. Due to this, the Get API will always mask the bottom 2 bits out. The Set API will, in addition, also make sure that the specified feature is present in the EnabledFeatures of the XState Configuration.
Keep in mind that if a hardcoded compaction mask was specified in InitializeContext2 (or the internal native APIs), the Set API should not be used other than to elide existing state bits (since adding a new bit would imply additional, non-initialized out-of-bounds state data in the CONTEXT_EX, which would’ve already been pre-allocated without this data).
NTSYSAPIULONG64NTAPIRtlGetExtendedFeaturesMask ( _In_ PCONTEXT_EX ContextEx);NTSYSAPIULONG64NTAPIRtlSetExtendedFeaturesMask ( _In_ PCONTEXT_EX ContextEx, _In_ ULONG64 FeatureMask);
The documented form of these APIs is as follows:
WINBASEAPIBOOLWINAPIGetXStateFeaturesMask ( _In_ PCONTEXT Context _Out_ PDWORD64 FeatureMask
);NTSYSAPIULONG64NTAPISetXStateFeaturesMask ( _In_ PCONTEXT Context, _In_ DWORD64 FeatureMask);
Locating XState Features in a CONTEXT_EX
Because of the complexity of the CONTEXT_EX structure, as well as the fact that XState features might be present in either compacted or non-compacted form, and that their presence is also dependent on the various state masks described earlier (especially if optimized XSAVE is supported), callers need a library function in order to quickly and easily obtain a pointer to the relevant state data in the XSAVE Area within the CONTEXT_EX.
Currently two such functions exist, shown below, with RtlLocateExtendedFeature being just a wrapper around RtlLocateExtendedFeature2, which supplies it with a pointer to the SharedUserData.XState as the Configuration parameter. As both are exported, callers can also manually specify their own custom XState Configuration in the latter API if they so choose.
NTSYSAPIPVOIDNTAPIRtlLocateExtendedFeature ( _In_ CONTEXT_EX ContextEx, _In_ ULONG FeatureId,
_Out_opt_ PULONG Length);
NTSYSAPI
PVOID
NTAPI
RtlLocateExtendedFeature2 (
_In_ CONTEXT_EX ContextEx,
_In_ ULONG FeatureId,
_In_ PXSTATE_CONFIGURATION Configuration,
_Out_opt_ PULONG Length
);
Both of the two functions receive a CONTEXT_EX structure and an ID for a requested feature, and parse the XState Configuration data in order to return a pointer for where the feature is stored in the XSAVE Area. Note that they don’t validate or return any actual value for the specified feature, which is up to the caller.
To find the pointer, RtlLocateExtendedFeature2 does the following:
- Makes sure that the Feature ID is above
2(since x87 FPU and SSE states are never saved throughXSAVEby Windows) and below 64 (the highest possible XState feature bit) - Gets the
XSAVE_AREA_HEADERfromCONTEXT_EX + CONTEXT_EX.XState.Offset - Reads the
Configuration->ControlFlags.CompactionEnabledflag to know if using compaction or not - If using the non-compacted format:
- Reads
Configuration->Features[n].Offsetand.Sizeto learn the offset and size of the requested feature in theXSAVEArea
- Reads
- If using the compacted format:
- Reads the
CompactionMaskfrom theXSAVE_AREA_HEADER(corresponding toXCOMP_BV) and checks if it contains the requested feature - Reads
Configuration->AllFeaturesto learn the sizes of all the enabled states whose state bit comes before the requested feature ID, and calculates the offset of the requested format based on adding up these sizes, aligning the beginning of each previous state area to64bytes if the corresponding bit is set inConfiguration->AlignedFeatures, and then finally aligning the start of the area for specified feature ID if needed as well - Reads the size of the requested feature from
Configuration.AllFeatures[n]
- Reads the
- Locates the feature in the
XSAVEArea based on its computed offset from above and returns a pointer to it, optionally alongside its respective size in the outputLengthvariable.
This means that to find the address of a certain feature with the non-compacted format, it’s enough to check in SharedUserData which features are supported by the processor. In the compacted format however, it’s impossible to rely on the offsets in SharedUserData, making it necessary to also check which features are enabled on the thread, and to calculate the right offset for the feature based on the sizes of all the previous features.
In legitimate Win32 applications, a different API is used, which internally calls the native API above, but with some pre-processing. Since state bit 0 and 1 are never saved as part of the XSAVE Area in the CONTEXT_EX, the Win32 API handles these two feature bits by grabbing them from the appropriate Legacy CONTEXT fields, namely FltSave for XSTATE_LEGACY_FLOATING_POINT and Xmm0 for XSTATE_LEGACY_SSE.
WINBASEAPI
PVOID
WINAPI
LocateXStateFeature (
    _In_ CONTEXT_EX Context,
    _In_ DWORD FeatureId,
    _Out_opt_ PDWORD Length
);
Example Usage and Output
In order to make sense out of the XState Internals, especially when combined with the CONTEXT_EX data structure, we’ve written a simple test program, available on our GitHub here. This utility demonstrates some of the API usage as well as the various offsets, sizes, and behaviors involved. Here’s the output of the program (which uses AVX registers) on a system with AVX, MPX, and Intel PT:

Among other things, note how the Legacy CONTEXT is at a negative offset, as expected, and how even though the system supports the x87 FPU State (1) and GSSE State (2), the XSAVEBV does not contain these bits as they are instead saved in the Legacy CONTEXT area (and hence, note the negative offsets of their associated state data). Following the XSAVE Header (itself at offset 0x30) which is 0x40 bytes, note that the AVX State (2) starts at offset 0x70 as the math would suggest.
CONTEXT_EX Validation
Since user-mode APIs can construct a CONTEXT_EX which eventually gets processed by the kernel and modifies privileged parts of the XSAVE area (namely, the CET state data), Windows must guard against undesirable modifications that can be done through APIs which accept a CONTEXT_EX, such as:
NtContinue, which is used to resume after an exception, handle longjmp CRT functionality, as well as perform stack unwindingNtRaiseException, which is used to inject an exception into an existing threadNtQueueUserApc, which is used to hijack execution flow of an existing threadNtSetContextThread, which is used to modify the processor registers/state of an existing thread
As any of these system calls could cause the kernel to modify either the IA32_PL3_SSP or the IA32_CET_U MSRs, as well as directly modify RIP to an unexpected target, Windows must validate that the passed-in CONTEXT_EX does not violate CET guarantees.
We’ll soon cover how this is done to validate the SSP in 19H1 and the addition of the RIP validation in 20H1. First though, a small refactor had to be done to reduce the potential for misusing NtContinue: the introduction of the NtContinueEx function.
NtContinueEx and KCONTINUE_ARGUMENT
As enumerated above, the functionality of NtContinue is used in a number of situations, and for CET to be resilient in the face of an API that allows arbitrary changes to processor state, greater fine grained control had to be added to the interface. This was done through the creation of a new enumeration called KCONTINUE_TYPE, which is present in a KCONTINUE_ARGUMENT data structure that must now be passed to the enhanced version of NtContinue — NtContinueEx.
This data structure also contains a new ContinueFlags field, which replaces the original TestAlert argument of NtContinue with the flag CONTINUE_FLAG_RAISE_ALERT (0x1), while also introducing a new CONTINUE_FLAG_BYPASS_CONTEXT_COPY (0x2) flag which directly delivers an APC with the new TrapFrame. This is an optimization which was previously implemented by checking if the CONTEXT record pointer was at a specific location in the user-stack, which made the function assume it was being used as part of User Mode APC delivery. Callers desiring this behavior must now explicitly set the flag in ContinueFlags instead.
Note that while the old interface continues to be supported for legacy reasons, it internally calls NtContinueEx which recognizes the input parameter as the BOOLEAN TestAlert parameter, and not a KCONTINUE_ARGUMENT. Such a case is treated as a KCONTINUE_UNWIND for purposes of the new interface.
As part of this refactor, the following four possible types exist:
KCONTINUE_UNWIND– This is used by legacy callers ofNtContinue, such asRtlRestoreContextandLdrInitializeThunk, which is used when unwinding from exceptions.
KCONTINUE_RESUME– This is used byKiInitializeUserApcwhen building theKCONTINUE_ARGUMENTstructure on the user mode stack thatKiUserApcDispatcherwill run on before callingNtContinueExagain.
KCONTINUE_LONGJUMP– This is used byRtlContinueLongJumpwhich is called byRtlRestoreContextif the exception code in the exception record isSTATUS_LONGJUMP.
KCONTINUE_SET– This is never passed toNtContinueExdirectly, but rather used when callingKeVerifyContextIpForUserCetfrom withinPspGetSetContextInternalin response to anNtSetContextThreadAPI.
Shadow Stack Pointer (SSP) Validation
As we mentioned, there are legitimate cases where user-mode code will need to change the shadow stack pointer, such as exception unwinding, APCs, longjmp, etc. But the operating system has to validate the new value requested for the SSP, in order to prevent CET bypasses. In 19H1 this was implemented by the new KeVerifyContextXStateCetU function. This function receives the thread whose context is being modified and the new context for the thread, and does the following:
- If the
CONTEXT_EXdoes not contain any XState data, or if the XState data does not contain CET registers (checked by callingRtlLocateExtendedFeature2with theXSTATE_CET_Ustate bit), no validation is needed.
- If CET is enabled on the target thread:
- Validate that the caller is not attempting to disable CET on this thread by masking out
XSTATE_MASK_CET_UfromXSAVEBV. If this is happening, the function will re-enable the state bit, setMSR_IA32_CET_SHSTK_EN(which is a flag that enables the Shadow Stack feature of CET) inIa32CetUMsr, and set the current shadow stack asIa32Pl3SspMsr. - Otherwise, call
KiVerifyContextXStateCetUEnabled, to validate that CET shadow stacks are enabled (MSR_IA32_CET_SHSTK_ENis enabled), that the newSSPis8-byte aligned, and that it is between the currentSSPvalue and the end of the shadow stack region’s VAD. Note that since stacks grow backward, the “end” of the region is actually the beginning of the stack. Therefore, when setting a new context for a thread, anySSPvalue is valid as long as it is inside the part of the shadow stack that has been used so far by the thread. There is no limit on how far back a thread can go inside its shadow stack.
- Validate that the caller is not attempting to disable CET on this thread by masking out
- If CET is disabled on the target thread and the caller is attempting the enable it by including the
XSTATE_CET_Umask in theXSAVEBVof theCONTEXT_EX, only allow both MSR values to be set to0(no shadow stacks, and noSSP).
Any failures in the validations described will return STATUS_SET_CONTEXT_DENIED, while STATUS_SUCCESS is returned in other cases.
Enabling CET also implicitly enables Check Stack Extents, originally implemented in Windows 8.1 together with CFG. This is visible through the CheckStackExtents bit in the ProcessFlags field of KPROCESS. This means that whenever the target SSP is being validated, KeVerifyContextRecord will also be called, and will verify that the target RSP is either part of the current thread’s TEB’s user stack limits (or the TEB32’s user stack limits, if this is a WOW64 process). These checks, implemented by RtlGuardIsValidStackPointer (and RtlGuardIsValidWow64StackPointer) have previously been documented (and shown as being insufficient) by researchers at both Tenable and enSilo.
Instruction Pointer (RIP) Validation
In 19030 another feature using Intel CET appeared – verifying that the new RIP that a caller is attempting to set for the process is a valid one. Just like SSP validation, this mitigation can only be enabled if cet is enabled for the thread. However, RIP validation is not enabled by default and must be enabled for the process (which is indicated by the UserCetSetContextIpValidation bit in the MitigationFlags2Values field of EPROCESS).
That being said, for the current builds, it appears that when calling CreateProcess and using the PROC_THREAD_ATTRIBUTE_MITIGATION_POLICY attribute, if the PROCESS_CREATION_MITIGATION_POLICY2_CET_USER_SHADOW_STACKS_ALWAYS_ON flag is enabled, the option will be set. (Note that calling the SetProcessMitgationPolicy API with the ProcessUserShadowStackPolicy value is not valid, as CET can only be enabled at process creation time).
Interestingly, however, a new mitigation option was added to the mitigation map, PS_MITIGATION_OPTION_USER_CET_SET_CONTEXT_IP_VALIDATION (32). Toggling this (undocumented) mitigation option has the effect of enabling the AuditUserCetSetContextIpValidation bit in the MitigationFlags2Values field instead, which will be described shortly. Additionally, because this is now the 32nd mitigation option (each of which takes up 4 bits for DEFERRED/OFF/ON/RESERVED), there are now thus 132 mitigation bits needed, and the PS_MITIGATION_OPTIONS_MAP has expanded to 3 64-bit array elements in the Map field (which has follow-on effects to the size of the PS_SYSTEM_DLL_INIT_BLOCK).
The new KeVerifyContextIpForUserCet function will be called whenever a thread’s context is about to be changed. It will check that both CET and the RIP mitigation are enabled for the thread, and also checks if CONTEXT_CONTROL flag set in the context parameter, meaning that RIP will be changed by this new context. If all these checks pass, it calls the internal KiVerifyContextIpForUserCet function. The purpose of this function is to validate that the target RIP is a valid value, and not one used by an exploit to run arbitrary code.
First it checks that the target RIP address is not a kernel address, and also not an address in the lower 0x10000 bytes, that should not be mapped. Then it retrieves that base trap frame and check if the target RIP is the RIP of that trap frame. This is meant to allow cases where the target RIP is the previous address in user mode. This will usually happen when this is the first time NtSetThreadContext is called for this thread, and the RIP is being set to the initial start address for the thread, but can also happen in other, less common cases.
The function receives the KCONTINUE_TYPE and based on its value, it handles the target RIP in different ways. In most cases it will iterate over the shadow stack and search for the target RIP. If it doesn’t find it, it will keep running until it hits an exception and gets to its exception handler. The exception handler will check if the KCONTINUE_TYPE supplied is KCONTINUE_UNWIND, and if it is call RtlVerifyUserUnwindTarget with the KCONTINUE_UNWIND flag. This function will try to verify RIP again, this time using more complex checks which we describe in the next section.
In any other case, it will return STATUS_SET_CONTEXT_DENIED, which will make KeVerifyContextIpForUserCet call the KiLogUserCetSetContextIpValidationAudit function in order to audit the failure if the AuditUserCetSetContextIpValidation flag is set in the EPROCESS. This “auditing” is quite interesting, as instead of being done over the usual process mitigation ETW channel, it is done by directly raising a fast fail exception through the Windows Error Reporting (WER) service (i.e.: sending a 0xC000409 exception with the information set to FAST_FAIL_SET_CONTEXT_DENIED). In order to avoid spamming WER, another EPROCESS bit, AuditUserCetSetContextIpValidationLogged, is used.
There is one case where the function will stop iterating over the shadow stack before finding the target RIP – if the thread is terminating and the current shadow stack address is page-aligned. This means that for terminating threads, the function will try to verify the target RIP only in the current page of the shadow stack as a “best effort”, but will not go any further than that. If it doesn’t find the target RIP in that page it will return STATUS_THREAD_IS_TERMINATING.
The other case in this function is when KCONTINUE_TYPE is KCONTINUE_LONGJUMP. Then the target RIP will not be validated against the shadow stack, but RtlVerifyUserUnwindTarget will be called instead with the KCONTINUE_LONGJUMP flag to verify RIP in the PE Image Load Configuration Directory’s longjmp table. We’ll describe this table and these checks in the next section of this blog post.
KeVerifyContextIpForUserCet is called by one of these 2 functions:
PspGetSetContextInternal– called in response to anNtSetContextThreadAPI.KiVerifyContextRecord– called in response toNtContinueEx,NtRaiseException, and in some casesNtSetContextThreadAPIs. Before callingKeVerifyContextIpForUserCet(Only if its receivedContinueArgumentis notNULL), this function checks if the caller is trying to modify theCSregister, and whether the new value is valid – non-WOW64 processes are only allowed to setCStoKGDT64_R3_CODE, unless they’re pico processes, in which case they can setCStoKGDT64_R3_CODEorKGDT64_R3_CMCODE. Any other value will makeKiVerifyContextRecordforce the newCSvalue toKGDT64_R3_CODE.KiVerifyContextRecordis either called byKiContinuePreviousModeUseror byKeVerifyContextRecord. In the second case, the function validates thatRSPis inside one of the process stacks (native or wow64), and that 64-bit processes will only ever setCStoKGDT64_R3_CODE.
All paths that call KeVerifyContextIpForUserCet to validate the target RIP first call KeVerifyContextXStateCetU to validate the target SSP and only perform the RIP checks if the SSP is determined to be valid.

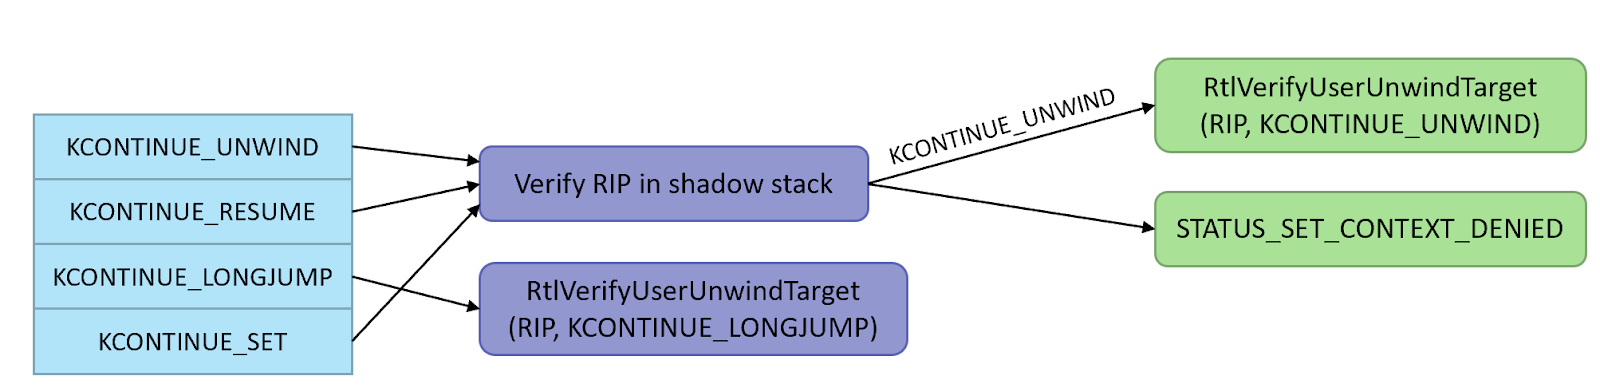
Exception unwinding and longjmp Validation
As shown above, the handling for KCONTEXT_SET and KCONTEXT_RESUME is concerned with validating that the target RIP is part of the Shadow Stack, but the other scenarios (KCONTEXT_UNWIND and KCONTEXT_LONGJMP) require extended validation through RtlVerifyUserUnwindTarget. This second validation path contains a number of interesting complexities that required changes to the PE file format (and compiler support) as well as a new OS-level information class added to NtSetInformationProcess for JIT compiler support.
Already added due to enhancements to Control Flow Guard (CFG) support, the Image Load Configuration Directory inside of the PE file now includes information for branch valid targets used as part of a setjmp/longjmp pair, which a modern compiler is supposed to identify and pass onto the linker. With CET, this existing data is re-used, but yet another table and size is added for exception handler continuation support. While Visual Studio 2017 produces the longjmp table, only Visual Studio 2019 produces this newer table.
In this last section, we’ll look at the format of these tables, and how the kernel is able to authorize the last two types of KCONTINUE_TYPE control flows.
PE Metadata Tables
In addition to the standard GFIDS Table that is present in Control Flow Guard images, Windows 10 also added support for validation of longjmp targets through the inclusion of a Long Jump Target Table typically located in a PE section called .gljmp, whose RVA is stored in the GuardLongJumpTargetTable field of the Image Load Configuration Directory.
Whenever a call to setjmp is made in code, the RVA of the return address (which is where longjmp will branch to) is added to this table. The presence of this table is determined by the IMAGE_GUARD_CF_LONGJUMP_TABLE_PRESENT flag in the GuardFlags of the Image Load Configuration Directory, and it contains as many entries as indicated by the GuardLongJumpTargetCount field.
Each entry is a 4-byte RVA, plus n bytes of metadata, where n is taken from the result of (GuardFlags & IMAGE_GUARD_CF_FUNCTION_TABLE_SIZE_MASK) >> IMAGE_GUARD_CF_FUNCTION_TABLE_SIZE_SHIFT. For this table, no metadata is defined, so the metadata bytes are always expected to be zero. Interestingly, because this calculation is the same as the one used for the GFIDS Table (which does potentially have metadata if export suppression is enabled), suppressing at least one CFG target will result in 1 byte of empty metadata being added to every entry in the Long Jump Target Table.
For example, here’s an PE file with two longjmp targets:

Note the value 1 in the upper nibble of GuardFlags (which corresponds to IMAGE_GUARD_CF_FUNCTION_TABLE_SIZE_MASK) due to the fact this image also uses CFG Export Suppression. This tells us that one extra byte of metadata will be present in the Long Jump Target Table, which you can see below:

On Windows 10 20H1, this type of metadata is now included in one additional situation — when exception handler continuation targets are present as part of a binary’s control flow. Two new fields — GuardEHContinuationTable and GuardEHContinuationCount — are added to the end of the Image Load Configuration Directory, and a IMAGE_GUARD_EH_CONTINUATION_TABLE_PRESENT flag is now part of the GuardFlags. The layout of this table is identical to the one shown for the Long Jump Target Table — including the addition of metadata bytes based on the upper nibble of GuardFlags.
Unfortunately, not even the current preview versions of Visual Studio 2019 generate this data, so we cannot currently show you an example — this analysis is based on reverse engineering the validation code that we describe later, as well as the Ntimage.h header file in the 20H1 SDK.
User Inverted Function Table
Now that we know that control flow changes might occur in order to branch to either a longjmp target or an exception handler continuation target, the question becomes — how do we get these two tables based on the RIP address present in a CONTEXT_EX as part of a NtContinueEx call? As these operations might happen frequently in the context of certain program executions, the kernel needs an efficient way to solve this problem.
You may already be familiar with the concept of the Inverted Function Table. Such a table is used by Ntdll.dll (LdrpInvertedFunctionTable), for finding the unwind opcodes and exception data during user-mode exception handling (to wit, by locating the .pdata section). Another table is present in Ntoskrnl.exe (PsInvertedFunctionTable) and is used during kernel-mode exception handling, as well as part of PatchGuard’s checks.
In short, the Inverted Function Table is an array containing all the loaded user / kernel modules their size, and a pointer to the PE Exception Directory, sorted by virtual address. It was originally created as an optimization, since searching this array is a lot faster than parsing the PE header and then searching the loaded modules linked list – a binary search on an inverted function table will quickly locate any virtual address in its respective module in only log(n) lookups. Ken Johnson and Matt Miller, now of Microsoft fame, previously published a thorough overview as part of their article on kernel-mode hooking techniques in the Uninformed Magazine.
Previously, however, Ntdll.dll only scanned its table for user-mode exceptions, and Ntoskrnl.exe only scanned its counterpart for kernel-mode exceptions — what 20H1 changes is that the kernel will now have to scan the user table too — as part of the new logic required to handle longjmp and exception continuations. To support this, a new RtlpLookupUserFunctionTableInverted function is added, which scans the KeUserInvertedFunctionTable variable, mapping to the now exported LdrpInvertedFunctionTable symbol in Ntdll.dll.
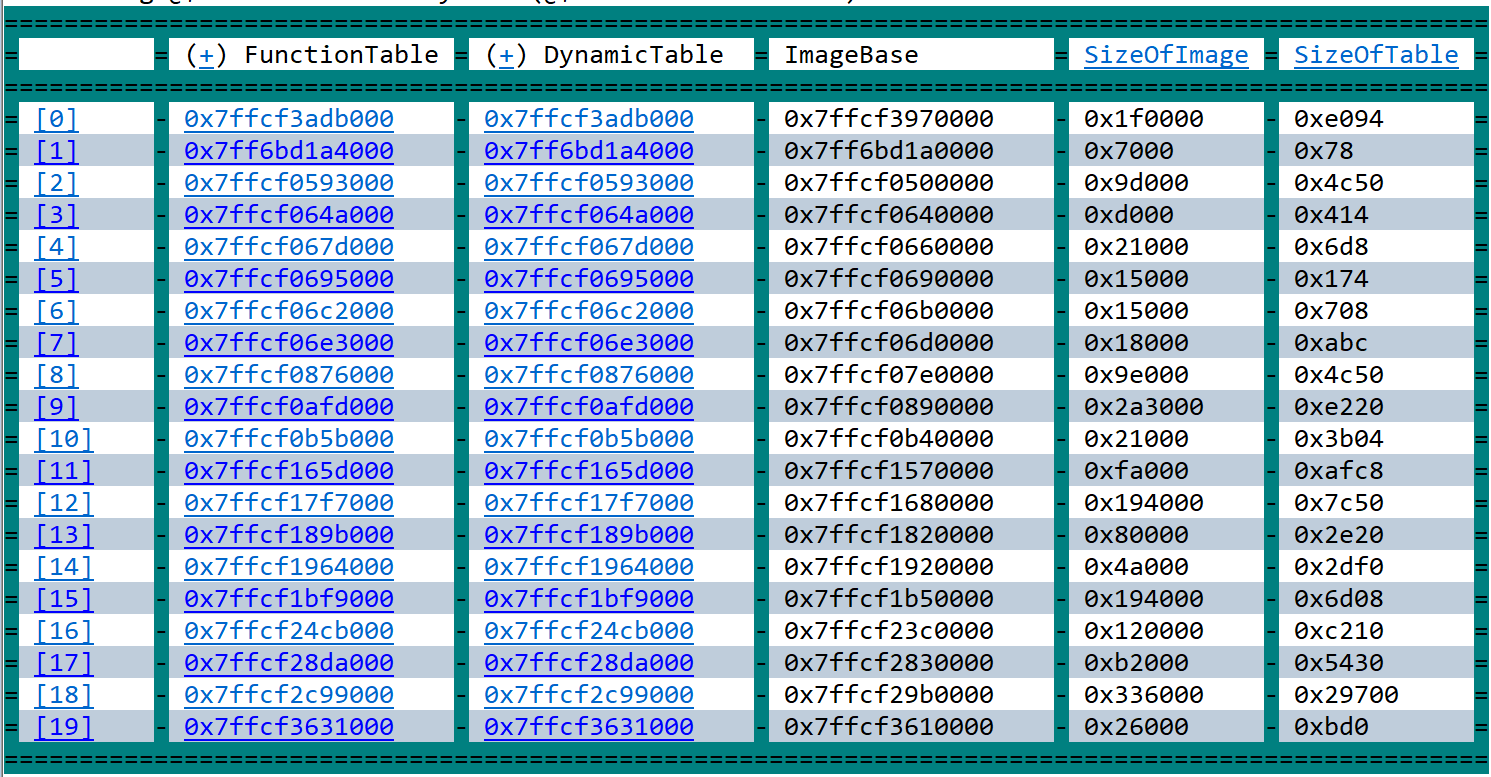
This is an exciting forensic capability, as it means that you now have an easy way, from the kernel, to locate the user-mode modules that are loaded within the current process, without having to parse the PEB’s loader data or enumerating VADs. For example, here’s how you can see the current loaded images in Csrss.exe:
dx @$cursession.Processes.Where(p => p.Name == "csrss.exe").First().SwitchTo()

dx -r0 @$table = *(nt!_INVERTED_FUNCTION_TABLE**)&nt!KeUserInvertedFunctionTable

dx -g @$table->TableEntry.Take(@$table->CurrentSize)
That being said, there does exist, however remote, the possibility that an image does not contain an exception directory, especially on x86 systems where unwind opcodes do not exist, and .pdata is only created if /SAFESEH is used and there’s at least one exception handler.
In those situations, RtlpLookupUserFunctionTableInverted can fail, and MmGetImageBase must be used instead. Unsurprisingly, this looks up any VAD that maps the region corresponding to the input RIP, and, if it’s an Image VAD, returns the base address and size of the region (which should correspond to that of the module).
Dynamic Exception Handler Continuation Targets
One final hurdle exists in the handling of KCONTINUE_UNWIND requests — although regular processes have static exception handler continuation targets based on the __try/__except/__finally clauses in their code, Windows allows JIT engines to not only dynamically create executable code on the fly, but also to register exception handlers (and unwind opcodes) for it at runtime, such as through the RtlAddFunctionTable API. While these exception handlers were previously only needed for user-mode stack walking and exception unwinding, now the continuation handlers become legitimate control flow targets that the kernel must understand as potentially valid values for RIP. It’s this last possibility that RtlpFindDynamicEHContinuationTarget handles.
As part of the CET support and introduction of NtContinueEx, the EPROCESS structure was enhanced with two new fields called DynamicEHContinuationTargetsLock and DynamicEHContinuationTargetsTree, the first of which is an EX_PUSH_LOCK and the latter an RTL_RB_TREE, which contains all the valid exception handler addresses. This tree is managed through a call to NtSetInformationProcess with a new process information class, ProcessDynamicEHContinuationTargets, which is accompanied by a data structure of type PROCESS_DYNAMIC_EH_CONTINUATION_TARGETS_INFORMATION, containing in turn an array of PROCESS_DYNAMIC_EH_CONTINUATION_TARGET entries, that will be validated before modifying the DynamicEHContinuationTargetsTree. To make things easier to follow, see the definitions below for these structures and flags:
#define DYNAMIC_EH_CONTINUATION_TARGET_ADD          0x01
#define DYNAMIC_EH_CONTINUATION_TARGET_PROCESSED    0x02

typedef struct _PROCESS_DYNAMIC_EH_CONTINUATION_TARGET
{ ULONG_PTR TargetAddress; ULONGLONG Flags;} PROCESS_DYNAMIC_EH_CONTINUATION_TARGET, *PPROCESS_DYNAMIC_EH_CONTINUATION_TARGET;
typedef struct _PROCESS_DYNAMIC_EH_CONTINUATION_TARGETS_INFORMATION{ USHORT NumberOfTargets; USHORT Reserved; ULONG Reserved2; PPROCESS_DYNAMIC_EH_CONTINUATION_TARGET* Targets;} PROCESS_DYNAMIC_EH_CONTINUATION_TARGETS_INFORMATION, *PPROCESS_DYNAMIC_EH_CONTINUATION_TARGETS_INFORMATION;
The PspProcessDynamicEHContinuationTargets function is called to iterate over this data, at which point RtlAddDynamicEHContinuationTarget is called for any entry containing the DYNAMIC_EH_CONTINUATION_TARGET_ADD flag set, which allocates a data structure storing the target address, and linking its RTL_BALANCED_NODE link with the RTL_RB_TREE in EPROCESS. Conversely, if the flag is missing, then the target is looked up, and if it indeed exists, is removed and its node freed. As each entry is processed, the DYNAMIC_EH_CONTINUATION_TARGET_PROCESSED flag is OR’ed into the original input buffer, so that callers can know which entries worked and which didn’t.
Obviously, it would appear that the existence of this capability is a universal bypass of any CET/CFG-like capability, as every possible ROP gadget could simply be added as a ‘dynamic continuation target’. However, since Microsoft now only legitimately supports out-of-process JIT compilation for browsers and Flash, it’s critical to note that this API only works for remote processes. In fact, calling it on the current process will always fail with STATUS_ACCESS_DENIED.
Target Validation
Bringing all of this knowledge together, the RtlVerifyUserUnwindTarget function becomes quite easy to explain.
- Lookup the loaded PE module associated with the target
RIPin theCONTEXT_EXstructure. First, try usingRtlpLookupUserFunctionTableInvertedand if that fails, switch to usingMmGetImageBaseinstead, making sure that the module is < 4GB. - If a module was found, call the
LdrImageDirectoryEntryToLoadConfigfunction to get its Image Load Configuration Directory. Then, make sure it’s large enough to contain either the Long Jump or Dynamic Exception Handler Continuation Target Table and that the guard flags containIMAGE_GUARD_CF_LONGJUMP_TABLE_PRESENTorIMAGE_GUARD_EH_CONTINUATION_TABLE_PRESENT. If the directory is missing, too small, or the matching table is simply not present, then returnSTATUS_SUCCESSfor compatibility reasons. - Get either
GuardLongJumpTargetTableorGuardEHContinuationTablefrom the Image Load Configuration Directory, and validate theGuardLongJumpTargetCountorGuardEHContinuationCount. If there are more than 4 billion entries, returnSTATUS_INTEGER_OVERFLOW. If there are more than0entries, then call do a binary search usingbsearch_s(passing inRtlpTargetCompareas the comparator) through the table to locate the targetRIPafter converting it to an RVA. If it is found, returnSTATUS_SUCCESS. - If the target
RIPwas not found (or if the table contained0entries to begin with), or if a loaded module was not found at the targetRIPin the first place, then returnSTATUS_SET_CONTEXT_DENIEDfor longjmp validations (KCONTINUE_LONGJUMP). - Otherwise, for exception unwinding validations (
KCONTINUE_UNWIND), callRtlpFindDynamicEHContinuationTargetto check if this was a registered dynamic exception handler continuation target. If yes, returnSTATUS_SUCCESS, otherwise returnSTATUS_SET_CONTEXT_DENIED.
Conclusion
The implementation of CET and its related mitigations are a major step towards eliminating the use of ROP and other control flow hijacking techniques. Control flow integrity is obviously a complicated topic, which will probably get even more complex as additional mitigations are added to it in the future. Further compatibility concerns and one-off scenarios will likely result in more and more cases to be discovered that will need specific handling. That said, such a big step in mitigation technology, especially one that includes so much new functionality, is bound to have gaps and issues, and we are sure that as more research is done in this area, interesting things will be discovered there in the future.
Read our other blog posts:
- Goodbye Secure Pool, Hello KDP Pool
- Secure Kernel Research with LiveCloudKd
- Troubleshooting a System Crash
- KASLR Leaks Restriction
- Investigating Filter Communication Ports
- An End to KASLR Bypasses?
- Understanding a New Mitigation: Module Tampering Protection
- One I/O Ring to Rule Them All: A Full Read/Write Exploit Primitive on Windows 11
- One Year to I/O Ring: What Changed?
- HyperGuard Part 3 – More SKPG Extents
Leave a comment