
A few months ago, I spoke at Paranoia conference about obscure and undocumented mitigations. Following the talk, a few people asked how I found out about these mitigations and how I figured out what they did and how they worked. So I thought I’d try to focus on one of those mitigations and show the full research process, as well as how the ideas behind it can be used for other purposes.
To do that I chose module tampering protection. I’ll start by explaining what it is and what it does for those of you who are only interested in the bottom line, and then show the whole process for those who would like to reproduce this work or learn some RE techniques.
TL;DR: What’s Module Tampering Protection?
Module tampering protection is a mitigation that protects against early modifications of the process main image, such as IAT hooking or process hollowing. It uses a total of three APIs: NtQueryVirtualMemory, NtQueryInformationProcess and NtMapViewOfSection. If enabled, the loader will check for changes in the main image headers and the IAT page before calling the entry point. It does that by calling NtQueryVirtualMemory with the information class MemoryWorkingSetExInformation. The returned structure contains information about the sharing status of the page, as well as whether it was modified from its original view. If the headers or the IAT have been modified from their original mappings (for example, if the main image has been unmapped and another image has been mapped in its place), the loader will call NtQueryInformationProcess with the class ProcessImageSection to get a handle to the main image section, and will then remap it using NtMapViewOfSection. From that point the new section will be used and the tampered copy of the image will be ignored.
This mitigation is available since RS3 and can be enabled on process creation using PROCESS_CREATION_MITIGATION_POLICY2_MODULE_TAMPERING_PROTECTION_MASK.
The Full Analysis
For those of you interested in the full path from knowing nothing about this mitigation to knowing everything about it, let’s start.
Discovering the Mitigation
One question I get occasionally is how people can even discover the existence of these types of mitigations when Microsoft never announces or documents them. So, one good place to look at would be the various MitigationFlags fields in the EPROCESS structure. There are currently three MitigationFlags fields (MitigationFlags, MitigationFlags2, MitigationsFlags3), each containing 32 bits. In the first two the whole 32 bits are already used, so MitigationFlags3 was recently added, and currently contains three mitigations, and I’m sure more will be added soon. These flags represent the enabled mitigations in the process. For example, we can use WinDbg to print EPROCESS.MitigationFlags for the current process:
dx @$curprocess.KernelObject.MitigationFlagsValues
@$curprocess.KernelObject.MitigationFlagsValues
    [+0x000 ( 0: 0)] ControlFlowGuardEnabled : 0x1 [Type: unsigned long]
    [+0x000 ( 1: 1)] ControlFlowGuardExportSuppressionEnabled : 0x0 [Type: unsigned long]
    [+0x000 ( 2: 2)] ControlFlowGuardStrict : 0x0 [Type: unsigned long]
    [+0x000 ( 3: 3)] DisallowStrippedImages : 0x0 [Type: unsigned long]
    [+0x000 ( 4: 4)] ForceRelocateImages : 0x0 [Type: unsigned long]
    [+0x000 ( 5: 5)] HighEntropyASLREnabled : 0x1 [Type: unsigned long]
    [+0x000 ( 6: 6)] StackRandomizationDisabled : 0x0 [Type: unsigned long]
    [+0x000 ( 7: 7)] ExtensionPointDisable : 0x0 [Type: unsigned long]
    [+0x000 ( 8: 8)] DisableDynamicCode : 0x0 [Type: unsigned long]
    [+0x000 ( 9: 9)] DisableDynamicCodeAllowOptOut : 0x0 [Type: unsigned long]
    [+0x000 (10:10)] DisableDynamicCodeAllowRemoteDowngrade : 0x0 [Type: unsigned long]
    [+0x000 (11:11)] AuditDisableDynamicCode : 0x0 [Type: unsigned long]
    [+0x000 (12:12)] DisallowWin32kSystemCalls : 0x0 [Type: unsigned long]
    [+0x000 (13:13)] AuditDisallowWin32kSystemCalls : 0x0 [Type: unsigned long]
    [+0x000 (14:14)] EnableFilteredWin32kAPIs : 0x0 [Type: unsigned long]
    [+0x000 (15:15)] AuditFilteredWin32kAPIs : 0x0 [Type: unsigned long]
    [+0x000 (16:16)] DisableNonSystemFonts : 0x0 [Type: unsigned long]
    [+0x000 (17:17)] AuditNonSystemFontLoading : 0x0 [Type: unsigned long]
    [+0x000 (18:18)] PreferSystem32Images : 0x0 [Type: unsigned long]
    [+0x000 (19:19)] ProhibitRemoteImageMap : 0x0 [Type: unsigned long]
    [+0x000 (20:20)] AuditProhibitRemoteImageMap : 0x0 [Type: unsigned long]
    [+0x000 (21:21)] ProhibitLowILImageMap : 0x0 [Type: unsigned long]
    [+0x000 (22:22)] AuditProhibitLowILImageMap : 0x0 [Type: unsigned long]
    [+0x000 (23:23)] SignatureMitigationOptIn : 0x0 [Type: unsigned long]
    [+0x000 (24:24)] AuditBlockNonMicrosoftBinaries : 0x0 [Type: unsigned long]
    [+0x000 (25:25)] AuditBlockNonMicrosoftBinariesAllowStore : 0x0 [Type: unsigned long]
    [+0x000 (26:26)] LoaderIntegrityContinuityEnabled : 0x0 [Type: unsigned long]
    [+0x000 (27:27)] AuditLoaderIntegrityContinuity : 0x0 [Type: unsigned long]
    [+0x000 (28:28)] EnableModuleTamperingProtection : 0x0 [Type: unsigned long]
    [+0x000 (29:29)] EnableModuleTamperingProtectionNoInherit : 0x0 [Type: unsigned long]
    [+0x000 (30:30)] RestrictIndirectBranchPrediction : 0x0 [Type: unsigned long]
    [+0x000 (31:31)] IsolateSecurityDomain : 0x0 [Type: unsigned long]
Towards the end, in bits 28 and 29, we can see the values EnableModuleTamperingProtection and EnableModuleTamperingProtectionNoInherit. Unfortunately, searching for these names doesn’t get any great results. There are a couple of websites that just show the structure with no explanation, one vague stack overflow answer that briefly mentions EnableModuleTamperingProtectionNoInherit with no added details, and this tweet:
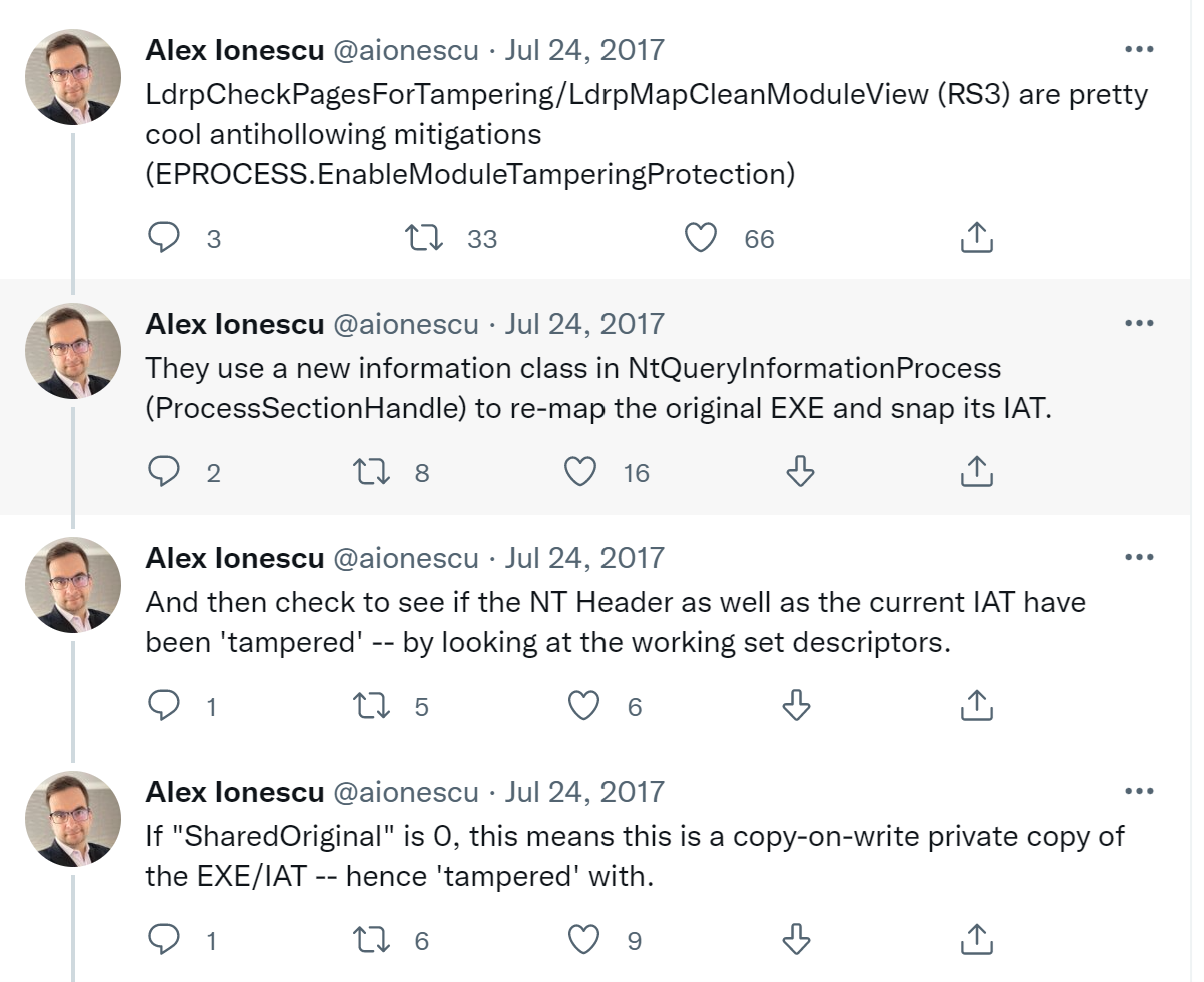
Unsurprisingly, the most detailed explanation is a tweet from Alex Ionescu from 2017. This isn’t exactly full documentation, but it’s a start. If you already know and understand the concepts that make up this mitigation, this series of tweets is probably very clear and explains all there is to know about the feature. If you’re not familiar with the underlying concepts, this probably raises more questions than answers. But don’t worry, we’ll take it apart piece-by-piece.
Where Do We Look?
The first question to answer is: where is this mitigation implemented? Alex gives us some direction with the function names, but if he didn’t, or things changed since 2017 (or you choose not to believe him), where would you start?
The first place to start searching for the implementation of process mitigations is often the kernel: ntoskrnl.exe. However, this is a huge binary that’s not easy to search through. There are no function names that seem at all relevant to this mitigation, so there’s no obvious place to start.
Instead, you could try a different approach and try to find references to the MitigationFlags field of the EPROCESS with access to one of those two flags. But unless you have access to the Windows source code, there’s no easy way to do that. What you can do however, is take advantage of the fact that the EPROCESS is a large structure and that MitigationFlags exists towards the end of it, at offset 0x9D0. One very inelegant but effective way to go is to use the IDA search function and search for all references to 9D0h:
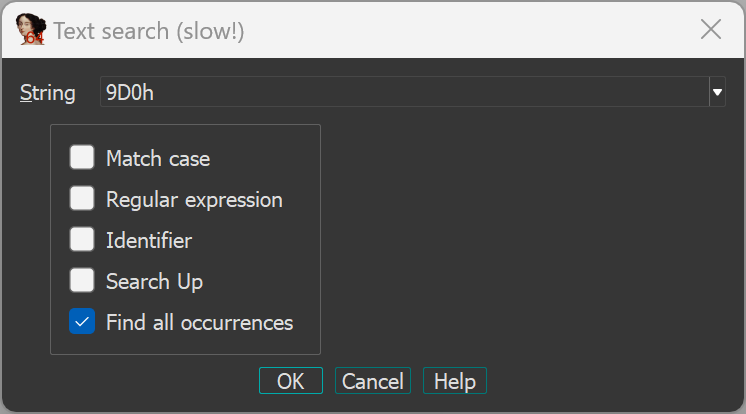
(Edit: instead of a text search, try an immediate search. It will run much faster while still getting all the relevant results)
This will be very slow because it’s a large binary, and some results will have nothing to do with the EPROCESS structure so you’d have to search through the results manually. Also, just finding references to the field is not enough – MitigationFlags contains 32 bits, and only two of them are relevant in the current context. So, you’d have to search through all the results for occurrences where:
0x9D0is used as an offset into anEPROCESSstructure – you’d have to use some intuition here since there is no guaranteed way to know the type of structure used by each case, though for larger offsets there are only a handful of options that could be relevant and it can mostly be guessed by the function name and context.- The
MitigationFlagsfield is being compared or set to either0x10000000(EnableModuleTamperingProtection) or0x20000000(EnableModuleTamperingProtectionNoInherit). Or bits 28 or 29 are tested or set by bit number through assembly instructions such asbtorbts.
After running the search, the results look something like this:

You can now walk through the results and get a feeling of what mitigations flags are used by the kernel and in which cases. And then I’ll let you know that this effort was completely useless since EnableModuleTamperingProtection is referenced at exactly one place in the kernel: PspApplyMitigationOptions, called when a new process is created:

So, the kernel keeps track of whether this mitigation is enabled, but never tests it. This means the mitigation itself is implemented elsewhere. This search might have been useless for this specific mitigation, but it’s one of several ways to find out where a mitigation is implemented and can be useful for other process mitigations, so I wanted to mention it even if it’s silly and unimpressive.
But back to module tampering protection – a second location where process mitigations are sometimes implemented is ntdll.dll, the first user-mode image to be loaded in every process. This DLL contains the loader, system call stubs, and many other basic components needed by all processes. It makes sense for this mitigation to be implemented here, since the name suggests it’s related to module loads, which happen through the loader in ntdll.dll. Additionally, this is the module that contains that functions Alex mentioned in his tweet.
Even if we didn’t have this tweet, just opening ntdll and searching for “tampering” quickly finds us exactly one result: the function LdrpCheckPagesForTampering. Looking for callers to this function we see that it’s called from a single place, LdrpGetImportDescriptorForSnap:
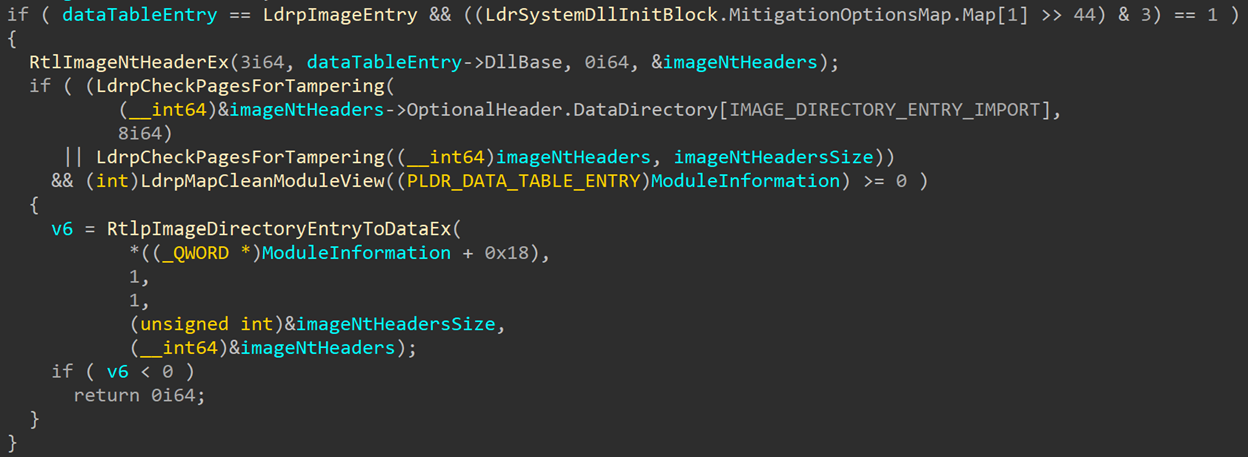
In the first line in the screenshot, we can see two checks: the first one validates that the current entry being processed is the main image, so the module being loaded in the main image module. The second check is for two bits in LdrSystemSllInitBlock.MitigationOptionsMap.Map[1]. We can see the exact field being checked here only because I applied the correct type to LdrSystemDllInitBlock – if you look at this function without applying the correct type, you’ll see some random, unnamed memory address being referenced instead. LdrSystemDllInitBlock is a data structure containing all the global information needed by the loader, such as the process mitigation options. It’s undocumented but has the type PS_SYSTEM_DLL_INIT_BLOCK that is available in the symbols so we can use it here (notice that this structure isn’t available in the NTDLL symbols, rather you’d find it in the symbols of ole32.dll and combase.dll). The MitigationOptionsMap field is just an array of three ULONG64s containing bits that mark the mitigation options that are set for this process. We can find the value for all the mitigation flags in WinBase.h. Here are the values for module tampering protection:
//
// Define the module tampering mitigation policy options.
//
#define PROCESS_CREATION_MITIGATION_POLICY2_MODULE_TAMPERING_PROTECTION_MASK (0x00000003ui64 << 12)
#define PROCESS_CREATION_MITIGATION_POLICY2_MODULE_TAMPERING_PROTECTION_DEFER (0x00000000ui64 << 12)
#define PROCESS_CREATION_MITIGATION_POLICY2_MODULE_TAMPERING_PROTECTION_ALWAYS_ON (0x00000001ui64 << 12)
#define PROCESS_CREATION_MITIGATION_POLICY2_MODULE_TAMPERING_PROTECTION_ALWAYS_OFF (0x00000002ui64 << 12)
#define PROCESS_CREATION_MITIGATION_POLICY2_MODULE_TAMPERING_PROTECTION_NOINHERIT (0x00000003ui64 << 12)
These values are relative to the top DWORD of Map[1], so the module tampering protection bit is actually at bit 44 of Map[1] – the same one being checked in the Hex Rays screenshot (and in PspApplyMitigationOptions, shown earlier).
Now we know where this mitigation is applied the checked, so we can start looking at the implementation and understand what this mitigation does.
Implementation Details
Looking again at LdrpGetImportDescriptorForSnap: after the two checks that we already saw, the function fetches the NT headers for the main image and calls LdrpCheckPagesForTampering twice. The first time, the address being sent is imageNtHeaders->OptionalHeader.DataDirectory[IMAGE_DIRECTORY_ENTRY_IMPORT] – the image’s import table – and a size of 8 bytes. The second time, the function is called with the address and size of the NT headers themselves. If one of these pages is deemed to be tampered, LdrpMapCleanModuleView gets called to (judging by the name) map a clean view of the main image module.
Let’s look inside LdrpCheckPagesForTampering to see how NTDLL decides if a page is tampered:
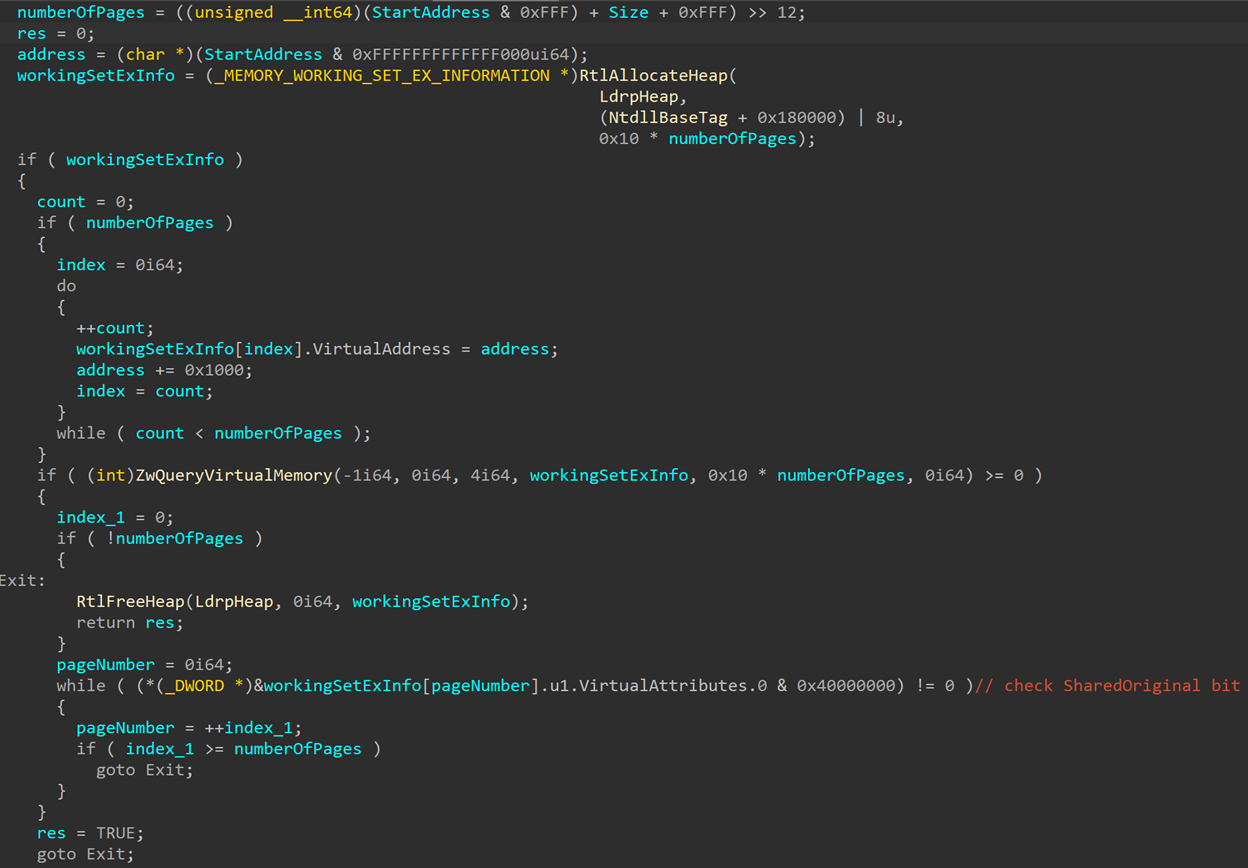
First, this function calculates the number of pages within the requested range of bytes (in both cases we’ve seen here, that number is 1). Then it allocates memory and calls ZwQueryVirtualMemory with MemoryInformationClass == 4 (MemoryWorkingSetExInformation). This system call and information class are ones security people might not see very often – the working set is a way to manage and prioritize physical memory pages based on their current status, so not often interesting for most security people. However, the working set does carry some attributes that could interest us. Specifically, the “shared” flags.
I won’t go into the detail of mapped and shared memory here, since they’re explained in plenty of other places. But in short, the system tries to not duplicate memory, as that would mean physical memory would quickly fill up with duplicated pages, mostly those belonging to images and DLLs – system DLLs like ntdll.dll or kernel32.dll are mapped in most (if not all) of the processes in the system, so having a separate copy in physical memory for each process would simply be wasteful. So, these image pages are shared between all processes. That is, unless the images are modified in any way. Image pages use a special protection called Copy On Write, which allows the pages to be writeable, but will create a fresh copy in physical memory if the page is written into. This means any changes done to a local mapping of a DLL (for example, the writing of user-mode hooks, or any data changes), will only affect the DLL in the current process.
These settings are saved as flags that can be queried through NtQueryVirtualMemory, with the information class used here: MemoryWorkingSetExInformation. It’ll return data about the queried pages in a MEMORY_WORKING_SET_EX_INFORMATION structure:
typedef struct _MEMORY_WORKING_SET_EX_BLOCK
{
union
{
struct
{
ULONG64 Valid : 1;
ULONG64 ShareCount : 3;
ULONG64 Win32Protection : 11;
ULONG64 Shared : 1;
ULONG64 Node : 6;
ULONG64 Locked : 1;
ULONG64 LargePage : 1;
ULONG64 Priority : 3;
ULONG64 Reserved : 3;
ULONG64 SharedOriginal : 1;
ULONG64 Bad : 1;
ULONG64 Win32GraphicsProtection : 4;
ULONG64 ReservedUlong : 28;
};
struct
{
struct
{
ULONG64 Valid : 1;
ULONG64 Reserved0 : 14;
ULONG64 Shared : 1;
ULONG64 Reserved1 : 5;
ULONG64 PageTable : 1;
ULONG64 Location : 2;
ULONG64 Priority : 3;
ULONG64 ModifiedList : 1;
ULONG64 Reserved2 : 2;
ULONG64 SharedOriginal : 1;
ULONG64 Bad : 1;
ULONG64 ReservedUlong : 32;
};
} Invalid;
};
} MEMORY_WORKING_SET_EX_BLOCK, *PMEMORY_WORKING_SET_EX_BLOCK;
typedef struct _MEMORY_WORKING_SET_EX_INFORMATION
{
PVOID VirtualAddress;
union
{
union
{
MEMORY_WORKING_SET_EX_BLOCK VirtualAttributes;
ULONG64 Long;
};
} u1;
} MEMORY_WORKING_SET_EX_INFORMATION, *PMEMORY_WORKING_SET_EX_INFORMATION;
This structure give you the virtual address that’s been queried, and bits containing information about the state of the page, such as: its validity, protection, is it a parge page, and its sharing status. There are a few different bits related to the sharing status of a page:
Shared– is the page shareable? That doesn’t necessarily mean that the page is currently shared with any other processes, but, for example, private memory will not be shared unless specifically requested by the process.ShareCount– this field tells you how many mappings exist for this page. For a page not currently shared with any other process, this will be1. For pages shared with other processes, this will normally be higher.SharedOriginal– this flag indicates whether this is the original mapping of this page. So, if a page was modified, which led to creating a fresh copy in physical memory, this will be set to zero as this isn’t the original mapping of the page.
This SharedOriginal bit is the one checked by LdrpCheckPagesForTampering to tell if this page is the original copy or a fresh copy created due to changes. If this isn’t the original copy, this means that the page was tampered with in some way so the function will return TRUE. LdrpCheckPagesForTampering runs this check for every page that’s being queried and will return TRUE if any of them have been tampered with.
If the function returned TRUE for any of the checked ranges, LdrpMapCleanModuleView gets called:
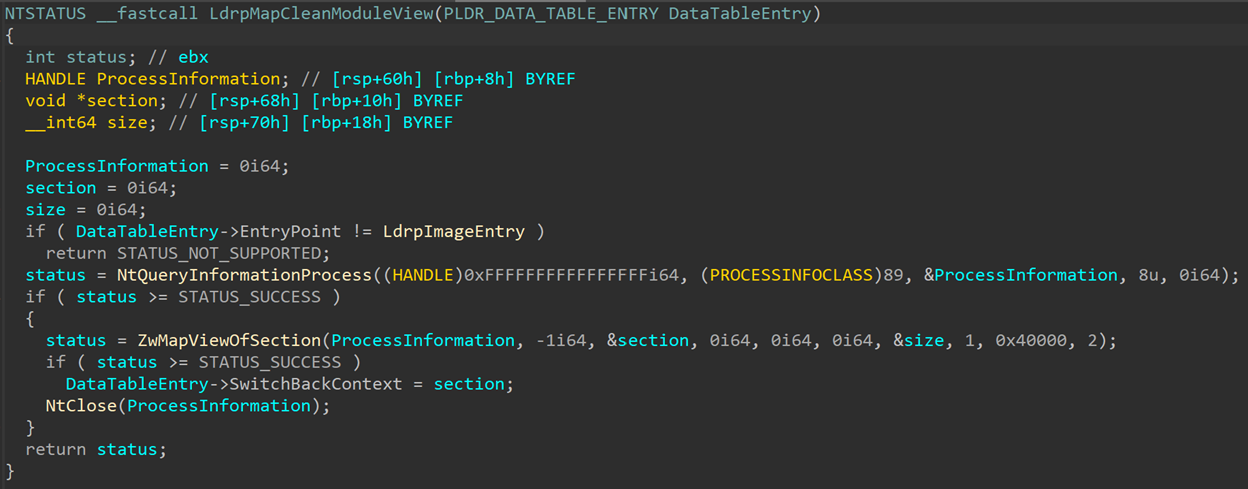
This function is short and simple: it calls NtQueryInformationProcess with InformationClass == 89 (ProcessImageSection) to fetch the section handle for the main image, then re-maps it using NtMapViewOfSection and closes the handle. It writes the address of the new section to DataTableEntry->SwitchBackContect, to be used instead of the original tampered mapping.
Why does this feature choose to check specifically these two ranges for tampering – the import table and the NT headers?
That’s because these are two places that will often be targeted by an attacker trying to hollow the process. If the main image is unmapped and replaced by a malicious image, the NT headers will be different and be considered tampered. Process hollowing can also tamper with the import table, to point to different functions than the ones the process expects. So, this is mostly an anti-hollowing feature, targeted to spotting tampering attempts in the main image, and replacing it with a fresh copy of the image that hasn’t been tampered with.
Limitations
Unfortunately, this feature is relatively limited. You can enable or disable it, and that’s about it. The functions implementing the mitigation are internal and can’t be called externally. So, for example, extending the mitigation to other modules is not possible unless you write the code for it yourself (and map the modules manually, since the section handles for those isn’t conveniently stored anywhere). Additionally, this mitigation contains no logging or ETW events. When the mitigation notices tampering in the main image it’ll silently map and use a new copy and leave no trace for security products or teams to find. The only hint will be that NtMapViewOfSection will be called again for the main image and generate an ETW event and kernel callback. But this is likely to go unnoticed as it doesn’t necessarily mean something bad happened and will probably not lead to any alerts or significant investigation of what might be a real attack.
On the bright side, this mitigation is extremely simple and useful, and very easily to mimic if you want to implement it for other use cases, such as detecting hooks placed on your process and mapping a fresh, unhooked copy of the page to use. You can do that instead of using direct system calls!
Who Uses This?
Running a query in WinDbg, I find no results for any process enabling module tampering protection. After a bit of probing around I managed to find only one process that enables this: SystemSettingsAdminFlows.exe. This process is executed when you open Apps->Optional Features in the Windows Settings menu. I don’t know why this specific process uses this mitigation or why it’s the only one that does, but this is the only one I managed to find so far that enables module tampering protection.
Conclusion
I tried to use this post to show a bit more of the work involved in analyzing an unknown feature and demonstrating some of the steps I take to scope and learn about a new piece of code. I hope this has been helpful and gave some of you useful tips in how to approach a new research topic!
- Random Windows Things Part 1: PreviousMode Mitigation
- Goodbye Secure Pool, Hello KDP Pool
- Secure Kernel Research with LiveCloudKd
- Troubleshooting a System Crash
- KASLR Leaks Restriction
- Investigating Filter Communication Ports
- An End to KASLR Bypasses?
- Understanding a New Mitigation: Module Tampering Protection
- One I/O Ring to Rule Them All: A Full Read/Write Exploit Primitive on Windows 11
- One Year to I/O Ring: What Changed?