
Introduction
In a previous post I went over vulnerability CVE-2020-1034, which allows arbitrary increment of an address, and saw how we can use some knowledge of ETW internals to exploit it, give our process SeDebugPrivilege and create an elevated process. In this post I will develop this exercise and make things harder by adding some restrictions and difficulties to see how we can bypass those and still get our wanted result – privilege escalation from a low or medium IL process to a system-level one.
New Limitations
The exploit I wrote in part one works just fine, but let’s imagine there is ever a new limitation in the kernel that doesn’t let us increment Token.Privileges.Enabled directly, for example making it a read-only field except for specific kernel code that is meant to modify it.
So, how can we enable a privilege without incrementing the address ourselves?
Enabling Privileges
The answer to that question is pretty simple – we enable them just like a process can enable any other privileges that it owns but are disabled – through RtlAdjustPrivilege, or it’s advapi32 wrapper – AdjustTokenPrivileges. But here we face a problem: When we try calling RtlAdjustPrivilege to enable our newly-added SeDebugPrivilege, we get back STATUS_PRIVILEGE_NOT_HELD.
To understand why this is happening we’ll have to take a look inside the very ugly and not very readable kernel functions that are in charge of enabling privileges in a token. To try and enable a privilege RtlAdjustPrivilege uses the system call NtAdjustPrivilegesToken, which calls the function SepAdjustPrivileges. This function first checks if a process is running with high, medium or low integrity level. If it has high IL, it can enable any privilege that it owns. However if it’s running with medium IL, we reach the following check:
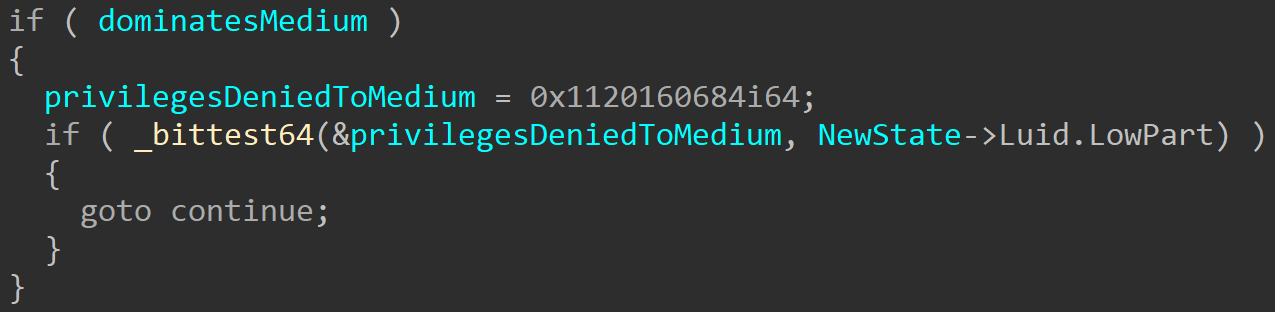
Each requested privilege is checked against this constant value, representing the privileges that medium IL processes are not allowed to have. The value of SeDebugPrivilege is 0x100000 (1 << 20), and we can see it’s one of the denied options so it cannot be enabled for processes that aren’t running with high integrity level, at least. If we choose to run our process as low IL or in an AppContainer, those have similar checks with even more restrictive values. As usual, the easy options failed early. However, there are always ways around those problems, we just need to look a bit deeper into the operating system to find them.
Fake EoP Leading to Real EoP
We need to have a high or System-IL process to enable debug privilege, but we were planning to use our new debug privilege to elevate ourselves (or our child process, to be exact) to System… So, we’re stuck, right?
Wrong. We don’t actually need a high or system-IL process, just a high or system-IL token. A process doesn’t always have to use the token it was created with. Threads can impersonate any token they have a handle to, including ones with higher integrity levels. Still, to do that we will need a handle to a process with higher IL than us, in order to duplicate its token and impersonate it. And to open a handle to such a process we’ll need to already have some privilege we don’t have, like debug privilege… and we’re stuck in a loop.
But as I learned from the many lawyers in my family (we are a good Jewish family after all, and no one wanted to be a doctor so we had to compensate) – every loop has a loophole, and this one is no different. We don’t need a handle to the token of a different process if we can cheat and create a token that matches the requirements ourselves!
To understand how that is possible we need to learn a bit about the Windows security model and how integrity levels work. To convince you to get through another 500 words of internals information I’ll tell you that Alex and I showed this idea to James Forshaw and he thought it was cool. And if he thinks it’s cool that should be a good enough reason for you to read through my rants until I finally circle back to the actual idea. And now to some internals stuff:
Tokens, Integrity Levels and Why an Unprotected Array is an Exploiter’s Best Friend
To check the integrity level of a token we need to look at a field named IntegrityLevelIndex inside the TOKEN structure. We can dump it for our process and see what it contains:
dx ((nt!_TOKEN*)(@$curprocess.KernelObject.Token.Object & ~0xf))->IntegrityLevelIndex
((nt!_TOKEN*)(@$curprocess.KernelObject.Token.Object & ~0xf))->IntegrityLevelIndex : 0xe [Type: unsigned long]
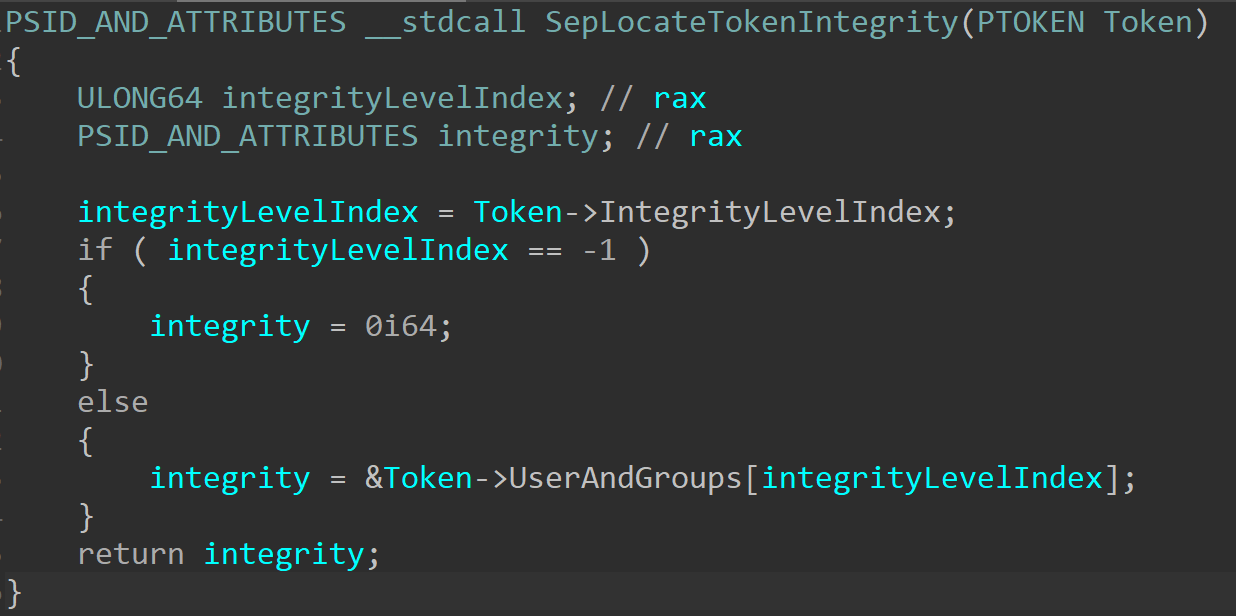
Like the name suggests, this value on its own doesn’t tell us much because it’s only an index inside an array of SID_AND_ATTRIBUTES structures, pointed to by the UserAndGroups field. We can verify this by looking at SepLocateTokenIntegrity, which is called by SepAdjustPrivileges to determine the integrity level of the token whose privileges it’s adjusting:
This array has multiple entries, the exact number of which changes between different processes. We can tell how many using the UserAndGroupCount field:
dx ((nt!_TOKEN*)(@$curprocess.KernelObject.Token.Object & ~0xf))->UserAndGroupCount
((nt!_TOKEN*)(@$curprocess.KernelObject.Token.Object & ~0xf))->UserAndGroupCount : 0xe [Type: unsigned long]
dx -g *((nt!_SID_AND_ATTRIBUTES(*)[0xe])((nt!_TOKEN*)(@$curprocess.KernelObject.Token.Object & ~0xf))->UserAndGroups)
This is cool and everything, but what does this actually mean and how does it help us fix our broken exploit?
Like the name suggests, a SID_AND_ATTRIBUTES structure contains a security descriptor (SID) and specific attributes for it. These attributes depend on the type of data we’re working with, in this case we can find the meaning of these attributes here. The security identifier part of the structure is the one telling us which user and groups this token belongs to. This piece of information determines what integrity level the token has and what it can and cannot do on the system. For example, only some groups can have access to certain processes and files, and in the previous blog post we learned that most GUIDs only allow certain groups to register them. SIDs have the format of S-1-X-…, which makes them easy to identify.
We can improve our WinDbg query to show all the groups that our token is a part of in a convenient format:
dx –s @$sidAndAttr = *((nt!_SID_AND_ATTRIBUTES(*)[0xf])((nt!_TOKEN*)(@$curprocess.KernelObject.Token.Object & ~0xf))->UserAndGroups)
dx -g @$sidAndAttr.Select(s => new {Attributes = s->Attributes, Sid = Debugger.Utility.Control.ExecuteCommand("!sid " + ((__int64)(s->Sid)).ToDisplayString("x"))[0].Remove(0, 8)})
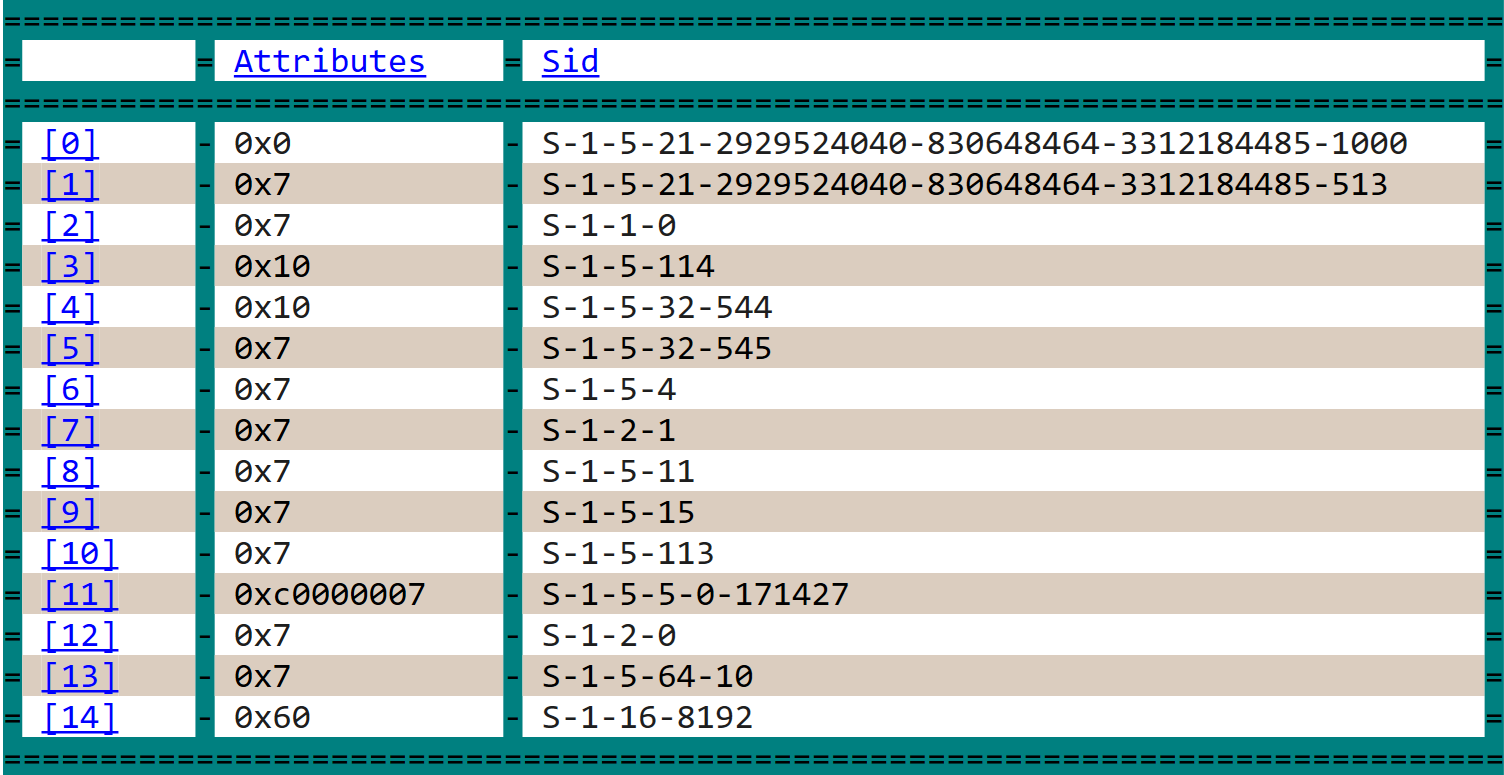
The entry that our token is pointing to, at 0xe, is the last one in the table, and it’s the SID for medium integrity level, which is the reason we can’t enable our debug privilege. However, the design of this system gives us a way to bypass out integrity level issue. The UserAndGroups field points to the array, but the array itself is allocated immediately after the TOKEN structure. And this is not the last thing in this memory block. If we dump the TOKEN structure we can see that right after the UserAndGroups field there is another pointer to an array of the same format, called RestrictedSids:
[+0x098] UserAndGroups    : 0xffffad8914e1e4f0 [Type: _SID_AND_ATTRIBUTES *]
[+0x0a0] RestrictedSids   : 0x0 [Type: _SID_AND_ATTRIBUTES *]
Restricted tokens are a way to limit the access that a certain process or thread will have by only allowing the token to access objects whose ACL specifically allows access to that SID. For example, if a token has a restricted SID for “Bob”, then the process or thread using this token can only access files if they explicitly allow access to “Bob”. Even if “Bob” is part of a group that is allowed to access the file (like Users or Everyone), it will be denied access unless the file “knows” in advance that “Bob” will try to access it and adds the SID to its ACL. This capability is sometimes used in services to restrict their access only to objects that are necessary for them to use and reduce the possible attack surface. Restricted tokens can also be used to remove default privileges from a token that doesn’t need them. For example, the BFE service uses a write restricted token. This means it can have read access to any object, but can only get write access to objects which explicitly allow its SID:
There are two important things to know about restricted tokens that make our elevation trick possible:
-
The array of restricted
SIDs is allocated immediately after theUserAndGroupsarray. -
It is possible to create a restricted token for any
SID, including ones that the process doesn’t currently have.
These 2 facts mean that even as a low or medium IL process, we can create a restricted token for high IL SID and impersonate it. This will add a new SID_AND_ATTRIBUTES entry to the RestrictedSids array, immediately after the UserAndGroups array, in a way that can be looked at as the next entry in the UserAndGroups array. The current IntegrityLevelIndex points to the last entry in the UserAndGroups array, so one little increment of the index will make it point to the new high IL restricted token. How lucky are we to have an arbitrary increment vulnerability?
Lets try this out. We use CreateWellKnownSid to create a WinHighLabelSid, and then use CreateRestrictedToken to create a new restricted token with a high IL SID, then impersonate it:
HANDLE tokenHandle;
HANDLE newTokenHandle;
HANDLE newTokenHandle2;
PSID pSid;
PSID_AND_ATTRIBUTES sidAndAttributes;
DWORD sidLength = 0;
BOOL bRes;
//
// Call CreateWellKnownSid once to check the needed size for the buffer
//
CreateWellKnownSid(WinHighLabelSid, NULL, NULL, &sidLength);
//
// Allocate a buffer and create a high IL SID
//
pSid = malloc(sidLength);
CreateWellKnownSid(WinHighLabelSid, NULL, pSid, &sidLength);
//
// Create a restricted token and impersonate it
//
sidAndAttributes = (PSID_AND_ATTRIBUTES)malloc(0x20);
sidAndAttributes->Sid = pSid;
sidAndAttributes->Attributes = 0;
bRes = OpenProcessToken(GetCurrentProcess(),
TOKEN_ALL_ACCESS,
&tokenHandle);
if (bRes == FALSE)
{
printf("OpenProcessToken failed\n");
return 0;
}
bRes = CreateRestrictedToken(tokenHandle,
WRITE_RESTRICTED,
0,
NULL,
0,
NULL,
1,
sidAndAttributes,
&newTokenHandle2);
if (bRes == FALSE)
{
printf("CreateRestrictedToken failed\n");
return 0;
}
bRes = ImpersonateLoggedOnUser(newTokenHandle2);
if (bRes == FALSE)
{
printf("Impersonation failed\n");
return 0;
}
Now lets look at our thread token and its groups. Notice that we are impersonating this new token, so we need to check the impersonation token of our thread, as our primary process token is not affected by any of this:
dx -s @$token = ((nt!_TOKEN*)(@$curthread.KernelObject.ClientSecurity.ImpersonationToken & ~0xf))

dx new {GroupsCount = @$token->UserAndGroupCount, UserAndGroups = @$token->UserAndGroups, RestrictedCount = @$token->RestrictedSidCount, RestrictedSids = @$token->RestrictedSids, IntegrityLevelIndex = @$token->IntegrityLevelIndex}
new {GroupsCount = @$token->UserAndGroupCount, UserAndGroups = @$token->UserAndGroups, RestrictedCount = @$token->RestrictedSidCount, RestrictedSids = @$token->RestrictedSids, IntegrityLevelIndex = @$token->IntegrityLevelIndex}

GroupsCount      : 0xf [Type: unsigned long]
UserAndGroups    : 0xffffad890d5ffe00 [Type: _SID_AND_ATTRIBUTES *]
RestrictedCount  : 0x1 [Type: unsigned long]
RestrictedSids   : 0xffffad890d5ffef0 [Type: _SID_AND_ATTRIBUTES *]
IntegrityLevelIndex : 0xe [Type: unsigned long]
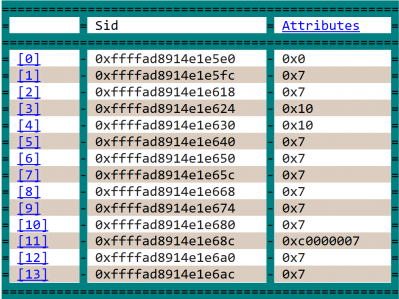
UserAndGroups still has 0xf entries and our IntegrityLevelIndex is still 0xe, like in the primary token. But now we have a restricted SID! I mentioned earlier that because of the memory layout we can treat this restricted SID like an additional entry in the UserAndGroups array, lets test that. We’ll try to dump the array the same way we did before, but pretend it has 0x10 entries:
dx -s @$sidAndAttr = *((nt!_SID_AND_ATTRIBUTES(*)[0x10])@$token->UserAndGroups)
dx -g @$sidAndAttr.Select(s => new {Attributes = s->Attributes, Sid = Debugger.Utility.Control.ExecuteCommand("!sid " + ((__int64)(s->Sid)).ToDisplayString("x"))[0].Remove(0, 8)})
And it works! It looks as if there are now 0x10 valid entries, and the last one has a high IL SID, just like we wanted.
Now we can run our exploit like we did before, with two small changes:
-
All changes need to use our current thread token instead of the primary process token.
-
We need to trigger the exploit twice – once to increment
Privileges.Presentto addSeDebugPrivilegeand another time to incrementIntegrityLevelIndexto point to entry0xf.
Nothing ever validates that the IntegrityLevelIndex is lower than UserAndGroupCount (and if something did, we could use the same vulnerability to increment it as well). So, when our new impersonation token points to a high IL SID, SepAdjustPrivileges thinks that it is running as a high IL process and lets us enable whichever privilege we want. After making the changes to the exploit we can run it again and see that RtlAdjustPrivileges returns STATUS_SUCCESS this time. But I never fully believe the API and want to check for myself:
Or if you prefer WinDbg:
dx -s @$t0 = ((nt!_TOKEN*)(@$curthread.KernelObject.ClientSecurity.ImpersonationToken & ~0xf))

1: kd> !token @$t0 -n
_TOKEN 0xffffad89168c4970
TS Session ID: 0x1
User: S-1-5-21-2929524040-830648464-3312184485-1000 (User:DESKTOP-3USPPSB\yshafir)
User Groups:
...
Privs:
19 0x000000013 SeShutdownPrivilege               Attributes -
20 0x000000014 SeDebugPrivilege                  Attributes - Enabled
23 0x000000017 SeChangeNotifyPrivilege           Attributes - Enabled Default
25 0x000000019 SeUndockPrivilege                 Attributes -
33 0x000000021 SeIncreaseWorkingSetPrivilege     Attributes -
34 0x000000022 SeTimeZonePrivilege               Attributes -
Authentication ID:         (0,2a084)
Impersonation Level:       Impersonation
TokenType:                 Impersonation
...
RestrictedSidCount: 1
RestrictedSids: 0xffffad89168c4ef0
Restricted SIDs:
00 S-1-16-12288 (Label: Mandatory Label\High Mandatory Level)
Attributes - Mandatory Default Enabled
…
Our impersonation token has SeDebugPrivilege, just like we wanted. Now we can do what we did last time and run an elevated cmd.exe under the DcomLaunch service. You might wonder if we really need to do that, now that we have a high IL token. But restricted tokens are still not really regular tokens, and we will probably face some issues if we try to run as a fake elevated process using a restricted token. It might also look a little suspicious to anyone who might be scanning our process, so it’s best to create a new process that can run as SYSTEM without any tricks.
Forensics
This trick we’re using is pretty cool, not only because it lets us cheat the system but also because it’s pretty hard to detect. The biggest tell for anyone looking for it would be that the IntegrityLevelIndex is outside the bounds of the UserAndGroups array, but even if someone looking at that it’s easy enough to trigger the vulnerability one more time to increment UserAndGroupCount as well. This is still detectable if you calculate the end address of the UserAndGroups array based on the count and compare it with the start address of the RestrictedSids array, seeing that they don’t match. But this is super specific detection that is probably a bit too much for a very uncommon technique.
A second way to find this is to search for threads impersonating restricted tokens. This is pretty uncommon and when I run this query the only process that comes up is my exploit:
dx @$cursession.Processes.Where(p => p.Threads.Where(t => t.KernelObject.ActiveImpersonationInfo != 0 && ((nt!_TOKEN*)(t.KernelObject.ClientSecurity.ImpersonationToken & ~0xf))->RestrictedSidCount != 0).Count() != 0)
@$cursession.Processes.Where(p => p.Threads.Where(t => t.KernelObject.ActiveImpersonationInfo != 0 && ((nt!_TOKEN*)(t.KernelObject.ClientSecurity.ImpersonationToken & ~0xf))->RestrictedSidCount != 0).Count() != 0)
[0x279c]         : exploit_part_2.exe [Switch To]
But this is a very targeted search, that will only find this very specific case. And anyway it’s easy enough to avoid by making the thread revert back to its original token after the privilege is enabled. This is generally a good practice – don’t let your exploit keep “suspicious” attributes for longer than necessary to minimize possible detections. However, all the forensic ideas I mentioned in the previous blog post still work in this case – we’re using the same vulnerability and triggering it the same way, so we still register a new ETW provider that no one else uses and leaving occupied slots that can never be emptied without crashing the system. So if you know what to look for, this is a pretty decent way to find it.
And of course, there is the fact that a Medium IL process suddenly managed to grab SeDebugPrivilege, open a handle to DcomLaunch and create a new reparented, elevated process. That would (hopefully) raise some flags for a couple of EDR products.
Conclusion
This post described a hypothetical scenario where we can’t simply increment Privileges.Enabled in our process token. We currently don’t need all these fancy tricks, but they are very cool to find and exploit, sort of like a DIY CTF, and maybe one day they will turn out to be useful in another context. These tricks clearly show that the token contains lots of interesting fields that can be used in various ways, and how a single increment and some internals knowledge can take you a long way.
Since the token is this vulnerable and doesn’t tend to change very often, maybe it’s time to protect it better, for example by moving it to the Secure Pool?
In this post and the previous one I ended up grabbing SeDebugPrivilege and using a reparenting trick to create a new elevated process. In a future post that might happen one day, I will look at some other privileges that are mostly ignored in the exploitation field and can be used in new and unexpected ways.
The full PoC for this technique can be found here.
Read our other blog posts:
- Random Windows Things Part 2: Unexpected Clipboard Data Behavior
- Random Windows Things Part 1: PreviousMode Mitigation
- Goodbye Secure Pool, Hello KDP Pool
- Secure Kernel Research with LiveCloudKd
- Troubleshooting a System Crash
- KASLR Leaks Restriction
- Investigating Filter Communication Ports
- An End to KASLR Bypasses?
- Understanding a New Mitigation: Module Tampering Protection
- One I/O Ring to Rule Them All: A Full Read/Write Exploit Primitive on Windows 11
Leave a comment